
In the context of our platform, an object refers to any entity or item that can be managed, tracked, or interacted with in the system through a tracking device configured with the object. Objects typically represent physical devices, such as vehicles or IoT hardware.
To efficiently upload vehicle records, whether individually or in bulk, please follow these outlined steps.
Watch : How to add GPS Device.
Watch : How to add Camera Device.
To Get Started
- Log in to your account.
- Go to Settings > General > Object.
Upon clicking on the object, users will be directed to the Object Overview page, where they can easily view and manage all object records.
To Add Object Individually
- Click on the ➕ button on the taskbar.
Navigate to General

-
- From the dropdown menus, select the Reseller, Company, and Branch under which you want to add the object.
- Enter the Name of the object.
- Enter the GPS Tracker ID provided with the GPS Device for your reference.
- Enter the GPS Tracker Serial Number provided with your GPS Device for your reference.
- Choose the appropriate Specification for your object from the dropdown list.
- Primary: The system will automatically set the "Primary" selection as the default option.
- Secondary: This option allows you to designate the device as a secondary device. This feature could be used specifically for video telematics setups where two devices are associated with the object: one for tracking purposes and another for capturing video data.

- When this option is selected, the Device Type dropdown will display the models available for video telematics devices.
- Once you select the secondary device in the specifications section, a dropdown menu will appear for you to choose the Primary Device associated with this object. This dropdown will display the available GPS devices or objects linked to the same company.
- Applicable Feature will display Video Telematics by default.
- Choose the GPS device model you wish to add from the Device Type dropdown menu.
- Please input the IMEI number associated with the selected device.
- Enter Satellite IMEI for Iridium supported device.
- You have the option to utilize the Copy From feature, which allows you to replicate the specifications of an existing object associated with the same device model.
- The system will provide the corresponding Server Address as you select the integrated device.
- The digits before the ( : ) Colon are the server IP.
- The digits after the( : ) Colon are the Port No

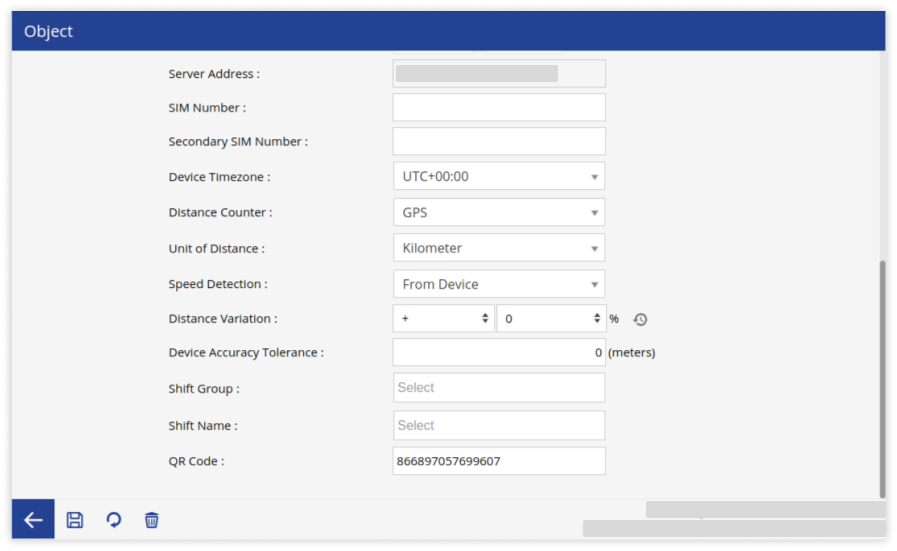
- Please provide the SIM Number and, if necessary, the Secondary SIM Number for accurate tracking and management.
- Select the Object Group from the drop-down list under which you want to add the device.
Please Note: to create object group, click here.
-
- Device Timezone should be added as per the timezone configured on the device.
- Choose the Unit of Distance from the dropdown.
- Choose the Distance Counter from the dropdown menu; this selection will determine how the distance traveled is calculated and displayed on the platform. It is recommended to set the default distance counter to GPS. If you are utilizing a CAN device, please opt for the CAN odometer instead.
- You can define Distance Variation to adjust the recorded distance traveled by the object in situations where the device is unable to provide accurate GPS data.
-
- Select your preferred Speed Detection option from the dropdown menu,
- From Device: select if you want to use speed data received from device.
- From LatIng: select if you want determine speed based on latitude and longitude changes.
- Select your preferred Speed Detection option from the dropdown menu,
-
- You can define the Device Accuracy Tolerance to neglect GPS drifting data within a specified range of meters when the device's accuracy is insufficient.
- If you intend to utilize the vehicle within a shift schedule, please select the appropriate Shift Group.
- Select Shift Name, as per the Shift Group that you selected.
- You have the option to specify a QR Code number assigned to the object, which can be used to serve various functions within the system.
Navigate to Profile

-
- Enter Plate Number of the object.
- Choose the appropriate Object Type of your vehicle by clicking on the corresponding icon.
Please Note: Tire Module, Eco Driving, Manage DVIR, Alert can be configured based on Object type as well.
-
- The Swap Icon feature allows users to display the default icon instead of a specific vehicle type icon when visibility issues arise. For instance, if the bike icon may not be clearly visible on the map, the client can swipe the bike icon with the default arrow for better visualization. The default icon automatically updates based on the currently mapped Object type, and users can revert to the default icon if required.
.png?width=558&height=70&name=Frame%20658%20(7).png)
- The Swap Icon feature allows users to display the default icon instead of a specific vehicle type icon when visibility issues arise. For instance, if the bike icon may not be clearly visible on the map, the client can swipe the bike icon with the default arrow for better visualization. The default icon automatically updates based on the currently mapped Object type, and users can revert to the default icon if required.
-
- From Color you can add the color details of the object type.
- click on the Add New option to add new color.
- From Color you can add the color details of the object type.
-
- Choose the appropriate Object Category, Object Brand, Object Model, and Object Axle to accurately classify your vehicle.
- Choose the appropriate DVIR Template from the dropdown menu, which is used for the Driver Vehicle Inspection Report (DVIR) after the vehicle's trip.
- You can record the object's Manufacture Date, Disposal Date and Purchase Date in the system.
- You can specify the Purchase Amount of the vehicle for your reference.
- You can specify the vehicle's Weight Capacity in tonnes.
- You can record the GPS Warranty and Installation Date of the device.
- You can enter the Measurement Tolerance of the vehicle. this tolerance will be used for area measurement.
- You can enter the Registration Number of the vehicle.
- Define the vehicle's predefined mileage value as specified by the company in the Company Average.
.png?width=495&height=574&name=Frame%20658%20(9).png)
- Please add or choose the appropriate Permit type of the vehicle from the dropdown menu.
- click on other to ass new permit.
-
- Choose the vehicle's Fuel Type from the dropdown.
- Enter the National Registry of Motor Vehicles of the Vehicle.
- Distance based Fuel Consumption: This feature calculates fuel usage based on distance traveled, helping monitor fuel efficiency and optimize resource management. To include distance-based fuel consumption, select the checkbox and input values in kilometers and liters.
- Eg:

- Eg:
- Duration-based Fuel Consumption: This feature calculates fuel usage based on the total operational duration of the vehicle, helping to assess fuel efficiency over a specific period. To include duration-based fuel consumption, select the checkbox and input values in minutes or hour:minute format, along with the corresponding liters.
- Eg:

- Eg:
Please Note: You can view the details in the Fuel Consumption Report. Reports - Fuel- Fuel Consumption.
-
- Fuel Idling Consumption on our platform refers to the fuel used by a vehicle when the engine is on, but the vehicle isn’t moving. This metric helps identify inefficiencies caused by unnecessary idling, enabling better fuel management and cost optimization.
- Define the Consumption Tolerance to help detect any abnormal fuel consumption patterns in vehicles that have a configured fuel sensor.
- You can record the VIN (Chassis Number) and Engine Number of the vehicle.
- You have the option to enter the Odometer reading value from the vehicle, allowing the system to automatically calculate the odometer reading based on the provided information.
- You can specify the LBS Detection Radius of the device.
- You can input the Engine Hour reading, which represents the cumulative time that the engine has been operational, regardless of whether the vehicle is moving or not. The system will utilize this information to calculate and display the engine hours accordingly.
- Define the No of Passenger Seats available in the vehicle, indicating the capacity of how many people can travel in that vehicle.
- Choose the appropriate Cost Based On option that aligns with your needs. This parameter will be utilized in the Travel report to reflect the expenses incurred based on the distance traveled.
- If necessary, enter the RFID Timeout Duration which defines the valid timeframe for an RFID tag swipe consideration. For instance, if set to 120 seconds, the system will accept the first swipe and disregard any subsequent swipes within that period.
- Define the Sleep Mode Duration in hours. This duration will be utilized to display the vehicle status on the system based on the sleep mode enabled/disabled on the device. For example, if a vehicle remains in sleep mode for the specified duration, it will be marked as inactive throughout the system until the device transmits data again.
- Minimum Working Hours: You have the option to specify the Minimum Working Hours for the vehicle in this field. The system will use this information to assess and measure the efficiency of vehicles based on their actual working hours, with the resulting analytics reflected in the vehicle efficiency report.
- Minimum Distance Traveled: You have the option to define the minimum travel distance for the vehicle in this field. The system will utilize this information to assess and analyze the efficiency of vehicles based on their actual traveled distance, with the resulting data reflected in the vehicle efficiency report.
- If you are planning to install a Weight Sensor in the vehicle, please check the corresponding checkbox and provide the necessary details for Object Empty Weight, Object Full Weight, Underweight Tolerance, Overweight Tolerance, and Loading/Unloading Tolerance.
- Underweight Tolerance, Overweight Tolerance, and Loading/Unloading Tolerance These will be used for genearting the alert.
.png?width=544&height=223&name=Frame%20654%20(4).png)
- Underweight Tolerance, Overweight Tolerance, and Loading/Unloading Tolerance These will be used for genearting the alert.
- If you have installed a Fuel Sensor, please specify the number of fuel sensors and tanks present in the vehicle. This information will be essential for accurate fuel calibration and subsequent fuel data analytics.
.png?width=487&height=108&name=Frame%20654%20(6).png)
- Single: Select single if the vehicle contains only single fuel tank.
-
Multiple: Select this option if the vehicle has multiple fuel tanks. When selected, the following parameters will be enabled:
- No of Tanks: Specify the number of tanks available in the vehicle.
- Fuel Calculation: To assess the fuel data for multiple tanks, you have the option to select whether to calculate the values individually for each tank or as a combined total.
- Individual: Choose this to display the fuel level for each tank separately on the live tracking screen and graph.
- Consolidated: Choose this to display the combined fuel value of all tanks.
- If you plan to install a G-sensor, which measures acceleration and detects sudden movements, please ensure to select the corresponding checkbox. Additionally, specify the predefined values for Axis-X, Axis-Y, and Axis-Z according to the vehicle model specifications provided by the manufacturer.
.png?width=526&height=154&name=Frame%20654%20(5).png)
Navigate to Sensors
- For Fuel sensor calibration, click here.
- For Ultrasonic fuel sensor calibration, click here.
- For Temperature sensor calibration, click here.
- For Humidity sensor calibration, click here.
- For Load sensor calibration, click here.
- For Tilt sensor calibration, click here.
- For RPM sensor calibration, click here.
- For Pressure Guage calibration, click here.
Navigate to Document
Users can Manage Documents of the vehicles in one place.
- Click on the Save 💾 icon to save the object.
To Add Objects in Bulk
- Click on the Upload button on the taskbar.

- A new Bulk Object Insert window will appear.
Please Note: The information you enter in this section will serve as standard details, which will be applied to all the objects you include in the Excel sheet.
- From the dropdown menus, select the Reseller, Company, and Branch under which you want to add the object.
- Choose the GPS device model you wish to add from the Device Type dropdown menu.
- You have the option to utilize the Copy From feature, which allows you to replicate the specifications of an existing object associated with the same device model.
- Define the RFID Timeout Duration based on your specific requirements. This setting determines the valid timeframe for recognizing an RFID tag swipe. The default value for this setting is 120 seconds. For example, if multiple RFID tag swiped during the specified timeframe, then the system will consider the first swipe and ignore any subsequent swipes.
- The system will provide the corresponding Server Address as you select the integrated device.
- Device Timezone should be added as per the timezone configured on the device.
- Select the SIM Provider that corresponds to the mobile service provider associated with the SIM card installed in the device.
- Choose the Distance Counter from the dropdown menu; this selection will determine how the distance traveled is calculated and displayed on the platform. It is recommended to set the default distance counter to GPS. If you are utilizing a CAN device, please opt for the CAN odometer instead.
- Select the Unit of Distance, and the system will operate according to the chosen unit.
- Select your preferred Speed Detection option from the dropdown menu, which can be determined based on latitude and longitude or directly from the device.
- To upload a file, first you need to Download the sample format from the given link.
- Fill in the details of objects in the required format and then Upload the file by clicking on the ➕ icon.
.png?width=466&height=494&name=Frame%20657%20(7).png)
- Based on the selected device type, a detailed Sensors table will be generated, outlining the connection type, associated sensors, reading types, and calculations for work hours. You can then proceed to configure the necessary sensor settings according to your requirements.
- Activate the connection type by clicking on the checkbox given in the Active column.
- Click on the dropdown of Connected Sensor and select the sensor.

- If you are using a digital sensor then you have to select Reading Type.
- You may activate the Work Hour Calculation feature to determine the working duration of the object, but this option will work only when a digital sensor is in use.
Please Note: When adding vehicles in bulk, the system will display only the list of Digital sensors available for selected Device Model.
- Click on the Save 💾 icon to save the setting.
Watch : How to Bulk Upload Vehicle.
To add a vehicle from the Mobile application, click here.
To download vehicle details from the Mobile application, click here.