Add Load Sensor
Load sensors are devices that are mounted on the axle to measure the weight of a vehicle or trolley. The system allows for the calibration of load sensors, ensuring accurate weight tracking within the software. Based on this calibration, the system generates analytics, including reports, graphs, and widgets, to help ensure vehicle safety, efficient load management, and compliance with regulatory requirements.
Before You Get Started
You need to configure the weight sensor details in the object profile.
- Log in to your account.
- Go to Settings > General > Object.
- Double-click on the object record for which you want to calibrate the sensor.
- Navigate to Profile.

- Select the checkbox for the Weight Sensor.
.png?width=544&height=223&name=Frame%20654%20(4).png)
-
- Object Empty Weight: Define the weight of the empty vehicle in tons.
- Object Full Weight: Define the weight of the empty vehicle in tons.
- Underweight Tolerance: The default value for Underweight Tolerance is set at 25%. This value can be adjusted to meet your specific requirements. In this context, 25% of the total load will be classified as underweight.
- Overweight Tolerance: The default value for Overweight Tolerance is set at 10%. This value can be adjusted to meet your specific requirements. In this context, 10% of the total load will be classified as overweight.
- Loading/Unloading Tolerance: The default value for Loading/Unloading Tolerance is set at 5%. This value can be adjusted to meet your specific requirements. In this context, an increase of 5% in the total load will be interpreted as loading, while a decrease of 5% will be understood as unloading.
- Select the checkbox for the Weight Sensor.
To Get Started
- Navigate to Sensors.

- Activate the connection type by clicking on the checkbox given in the Active column.

- Click on the drop-down of Connected Sensor and select Load Sensor.
- Click on the Calibration
 button. A new window will appear.
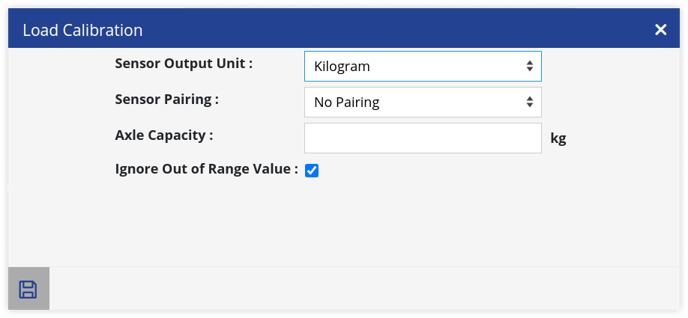
Users have the flexibility to Calibrate the Load sensor using various Sensor Output Units, including Kilograms, Tons, Voltage, and Numeric values.
Kilogram & Ton:
- Sensor Output Unit: It refers to the unit of measurement or data format in which the sensor transmits its output. Select the appropriate output unit for the Load sensor from the drop-down list.

- Sensor Pairing: Multiple sensors can be added and paired on each axle. In the sensor pairing section, a dropdown will display all available load sensors. Select the desired sensor to pair it with another. Paired sensors will not appear in the dropdown again.
-
Axle Capacity: The axle capacity refers to the maximum load that each individual axle can support, which is essential for calculating the overall load capacity of the vehicle. When a load sensor is paired with another sensor, the overall load capacity is determined by calculating the average capacity of each axle.
Please Note: If the Axle Capacity is not specified during calibration, the analytics generated in graphs and reports will not include Underweight and Overweight information.
-
Ignore Out of Range Value: When this option is selected, any out-of-range values sent by the sensor will be neglected.
Voltage:
-1.png?width=688&height=317&name=Frame%20667%20(1)-1.png)
-
Download the Sample File from the given link and input the Voltage along with the corresponding load values for each voltage based on the calibration of the sensor.
-
Calibration Via:
- XLS Upload: Upload the Load Sensor Calibration file in Upload Calibration File.
- .Manual: You can add individual Voltage and corresponding Load values by clicking on the ➕ icon.
-1.png?width=688&height=134&name=Frame%20667%20(2)-1.png)
Numeric Value:
-
Some load sensors provide output in numeric values ranging from 0 to 10,000, rather than in voltage. Therefore, to calibrate these sensors accurately, the Numeric Value output unit will be utilized.
.png?width=688&height=308&name=Frame%20667%20(24).png)
-
Download the Sample File from the given link and input the Numeric value along with the corresponding load values for each numeric value based on the calibration of the sensor.
-
Calibration Via:
- XLS Upload: Upload the Load Sensor Calibration file in Upload Calibration File.
- Manual: You can add individual Numeric Value and corresponding Load values by clicking on the ➕ icon.
-1.png?width=688&height=175&name=Frame%20667%20(3)-1.png)
- The processes for Sensor Pairing and the option to Ignore Out of Range Values will follow the same procedures outlined previously.
- Click on the Save 💾 icon to save the entire configuration.
Please Note: In the case that you have multiple load sensors, please ensure to configure each one individually by following the same procedure outlined in this article.
