Set Rule for Company
Admin or Reseller can configure rules for the Company account. These rules are intended to enhance the personalized experience for companies managing their fleets.
Please Note: Once a rule is activated, it cannot be modified. If you wish to modify any properties, you will need to create a new rule.
To Get Started
- Login to the Admin/Reseller account.
- Go to Settings > General > Company.
- Double-click on the reseller account for which you want to set the rule.
- Navigate to Rule.

To Set the Rule
- Click on Add New. A new window labeled Company Rule will open.

-
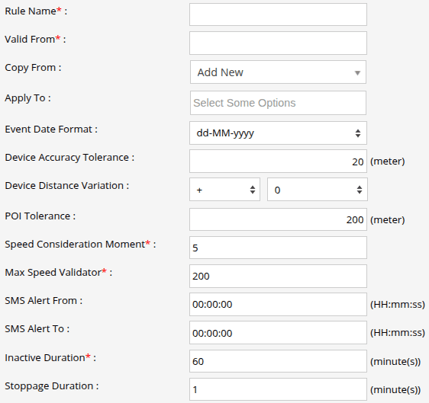
- In the field Rule Name, specify the name of the rule for your reference.
- In the field, Valid From, choose the starting date for when this rule will take effect.
- Copy From: Existing company rules for companies under the same reseller will appear in the drop-down, allowing you to copy the rule from the existing rules.
- Apply To: A multiple company selection drop-down will appear, allowing users to select one or more companies within the same reseller. This selection enables users to apply the rule chosen in the Copy From field to the selected companies.
- In the field Event Date Format, select the preferred date format that the reseller will use to view events in their account.
-
- Define the Device Accuracy Tolerance to ignore GPS data that may be drifting when the device’s accuracy is poor. This helps filter out inaccurate location points within the defined range.
- Define Device Distance Variation to adjust the recorded distance traveled by the object in situations where the device is unable to provide accurate GPS data.
- Add POI Tolerance according to the requirement.
- Add Speed Consideration Moment and Max Speed Validator.
-
-
SMS Alert From and SMS Alert To are used to specify the time duration during which alerts should be generated for a specific company user. The user will not receive the alerts after the specified time duration.
-
SMS Alert From: Enter a specified time to start generating the alerts.
- SMS Alert To: Enter a specified time until which the alerts should be generated.
-
- Enter Inactive Duration, Stoppage Duration, and Idle Duration.

- Select the Speed Limit from the predefined list. This limit will be used to highlight the vehicle's playback path in red where the recorded speed exceeds the configured limit.
-
-
- Enter a Welcome Message which will be displayed on the startup screen upon user login.
- Enter the Device Connectivity Check parameter.
- Live Stream Auto Closer Timer: This field defines the duration after which live streaming for video devices will automatically stop. The default duration is set to 15 minutes, but it can be configured as needed. This feature helps manage SIM data usage and prevents unnecessary consumption if the user leaves streaming active while switching tabs.
- You can enable the Hide History Legend on Live Tracking to hide the history data in the playback path, which is usually displayed in black. When this option is enabled, the path will appear in blue.
- Select your preferred method for calculating work hours from the predefined Work Hour Calculation options. The work hour calculated with the chosen method will be reflected in all the report where work hour is displayed on the platform.
- Elock Authentication: When enabled, the Elock can only be unlocked after authentication. This is done via an OTP sent through Email or SMS.
- Vehicle Info 1, 2, 3, 4, 5 : You can add custom fields on the object screen by selecting the checkboxes for Vehicle Info 1, 2, etc., and entering the desired label name. These fields will also be visible in the Travel and Trip Reports on the system.
Please Note: The new labels created under Object Info will get reflected under the Profile Tab on Object Screen.
-
-
Push Driver Master: This feature allows users to share Driver Master data (with Create and Edit Driver privileges) via API to third-party software. Clients must follow the provided documentation to integrate this API data into their system.
Upon enabling the Push Driver Master checkbox, the following details must be configured:
- URL: The endpoint URL of the client’s server where data will be pushed.
- Method: The default method is POST to transmit the data.
- Authorization: The Authorization or token needs to be configured.
- Client ID: The unique identifier for client authentication.
-
Please Note: To integrate the Push Driver Master feature, please contact us for further details and assistance.
- Click on the Save 💾 icon.
