
Users have the ability to enhance their work assignment processes, optimize route planning, and manage tasks effectively, thereby improving the efficiency and convenience of job scheduling.
They can create jobs either individually or in bulk. This document serves as a comprehensive guide on how to create a job.
To Create a Job
-
Log in to your account.
- Go to Settings > Master > Job.
Upon clicking on Job, you will be taken to the jobs overview page, where you can view all existing job records.
Watch : How to configure Job.
-
Click on the ➕ button on the taskbar.

-
The Job Planning screen will now be displayed.
.png?width=670&height=346&name=Frame%20639%20(14).png)
-
-
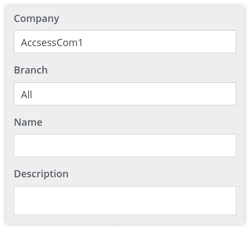
Select the appropriate Company and Branch from the drop-down menu under which you wish to create the job.
-
Provide the Name and Description of the job to ensure clear identification and understanding of the task.
-
-
-
Choose the Job Type that best fits your requirement.
-
Without Object: This feature enables job creation with a defined route and specific conditions without allocating an object, allowing the same job to be utilized later for multiple objects. This enhances efficiency by eliminating the need to recreate identical jobs.
.png?width=316&height=218&name=Frame%20639%20(2).png)
-
With Object: Choose the "With Object" option if you wish to create a job that involves a specific object.
.png?width=305&height=451&name=Frame%20639%20(3).png)
-
Assign To: Choose the vehicle from the drop-down list that you wish to assign for this job.
-
Select Representative from the dropdown list if a representative is involved with the job.
-
-
-
To assign a Representative for the job, it is essential to first create a representative from the driver screen, ensuring their role is designated as "Representative." Please note that only representatives associated with the selected company will appear in the drop-down list for your selection. To know more about representative click here.
-
-
Consider Via: Select the appropriate option to determine how the checkpoint is considered visited based on the condition set.
-
-
Map: Choose this option to mark a checkpoint as visited when the vehicle reaches its location on the map.
-
QR Code: Select this option to mark a checkpoint as visited by scanning the QR code.
-
Once this option is selected, you will get the QR code download option beside the checkpoint. Also, you can download the QR code for all the
.png?width=670&height=119&name=Frame%20659%20(7).png)
-
-
-
-
-
-
Convoy: A convoy is a group of vehicles traveling together on the same route for safety, efficiency, or coordination, ensuring timely delivery, shared resources, and enhanced security during transit.
-
To enable the Convey option, please check the corresponding box.
-
Objects: Select the desired objects that you want to add as a convoy from the dropdown list.
-
Convoy Tolerance: This refers to the allowed distance between vehicles in a convoy for effective coordination during transit, with a default setting of 200 meters that can be adjusted as needed.
.png?width=329&height=211&name=Frame%20639%20(4).png)
-
-
Object Load State: Choose the current status of the load on the vehicle during the job from the dropdown menu, or feel free to add a new status if necessary.
-
Upload File: You have the option to upload any relevant documents related to the job for easy access and reference. Uploaded document can be accessed by driver from Trakzee Driver application.
-
Schedule Type: Schedule the job according to your specific needs.
-
Relative: Select Relative if you want to create a schedule that repeats on a timely basis. Select the Schedule as per requirement.
.png?width=303&height=88&name=Frame%20639%20(8).png)
-
Daily: Select Daily if you wish to schedule the job to occur on a daily basis.
.png?width=332&height=445&name=Frame%20639%20(9).png)
-
-
-
-
-
-
-
Weekly: Choose this option to schedule a job that recurs every week. You can then specify the particular days of the week on which you would like the job to occur.
.png?width=330&height=124&name=Frame%20639%20(6).png)
-
Monthly: Choose this option if you wish to schedule a job that occurs once a month. You will then select the specific dates for the job's monthly schedule.
.png?width=329&height=220&name=Frame%20639%20(7).png)
-
Please input the Estimated Start Time, Estimated End Time, and the Force Close Duration in the respective fields.
- Force Close Duration: Specify the duration after which incomplete jobs should auto-closed.
-
Please choose the start and end dates in the Valid From and Valid To fields using the date picker to define the validity period for the job.
-
-
Fixed: To create a Fixed schedule that occurs at a specific time without repetition, please select the Fixed option.
.png?width=331&height=240&name=Frame%20639%20(10).png)
-
Force Close Duration: Specify the duration after which incomplete jobs should auto-closed.
-
Start-End Time: Select specify the start and end date and time for the job.
-
-
Automatic: Choose the Automatic option to establish a schedule that operates independently of time constraints.
.png?width=335&height=313&name=Frame%20639%20(11).png)
-
Please choose the start and end dates in the Valid From and Valid To fields using the date picker to define the validity period for the job.
-
-
- Click on Send Tracking Link, to send the Job tracking link on the mentioned Email & Mobile No.

-
To Create Job Route
-
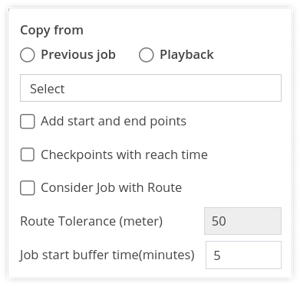
Copy From: You can copy the job configuration from any existing created job or from the playback of the object.
-
-
Previous Job: Choose this option to copy details from a previous job. Select the desired job from the dropdown list.
-
Playback: Use this option to copy route details from a past playback of the vehicle. Select the desired playback entry from the dropdown list.
-
-
Add Start and End Points: Select this option to include the start and end points in the job.

- You will get additional option named Job Start Logic and Start and End Point as Same.
- Job Start Logic: you can configure this to determine how the Job will Start.

- Any Data, select this option to start the Job when Any data is received from the device.
- Ignition ON, select this option to start the Job when Ignition ON data is received from the device.
- Start and End Point as Same: Enable this option if the start point and end point of the route are the same. This is useful when the trip begins and ends at the same location.
- Job Start Logic: you can configure this to determine how the Job will Start.
- You will get additional option named Job Start Logic and Start and End Point as Same.
-
Checkpoints with reach time: Choose this option if you require the vehicle to visit checkpoints at specific times.

- In Estimated Reach Time, Specify the time at which the vehicle should reach the check point.
- In Early Arrival, Specify the time (H:MM) that the vehicle is allowed to arrive earlier than the estimated reach time at the checkpoint.
- In Delay Arrival, Specify the time (H:MM) that the vehicle is allowed to arrive later than the estimated reach time at the checkpoint.
-
Consider Job with Route: Use this option to associate the job with a specific route only. This will also enable the Route Tolerance Option.

Please Note: For Maps other Than OSM Map, the user will require the Routing API to be enabled in the MAP Key in order to get route for checkpoints.
-
-
Route Tolerance (meters): Specify the allowable deviation from the route. An alert will be triggered if the vehicle exceeds this tolerance. The default route tolerance is 50 meters but can be adjusted as needed.
-
Please Note: You can configure the Job Route Deviation alert, if Consider Job with Route
- Temperature Threshold: Specify the Maximum and Minimun Temperature limit for this Job. this will work if you have temperature sensor attached for the selected vehicle.

Please Note: You can configure the Job Temperature Violation alert, if Temperature Threshold option is selected.
-
Job Start Buffer Time (minutes): Define the additional time allowed before the scheduled job start time. This buffer ensures flexibility in accommodating delays.
Please Note: Checkpoints with reach time and Job Start Buffer Time (minutes) will not be considered during the automatic job.
To Add Checkpoints
-
Click on the ➕ button.

- You will get two Option SIngle Checkpoint and Multiple Checkpoint.

- You will get two Option SIngle Checkpoint and Multiple Checkpoint.
-
-
- Click on Single Checkpoint, if you want to add one checkpoint at a time. The following pop up will appear.
.png?width=538&height=571&name=Frame%20639%20(16).png)
- To add checkpoint location there are 2 options, Map & Address Book.
-
- Select Map if you want to add address from the map itself, click on the
 search bar to search & add the location of the checkpoint.
 - Select Address Book if you want to select the checkpoint from the available address in the software. click on drop-down option to select the checkpoint.

- Select Map if you want to add address from the map itself, click on the
- Click on Single Checkpoint, if you want to add one checkpoint at a time. The following pop up will appear.
-
-
-
-
-
Enter the Name of the checkpoint.
-
Checkpoint State: You can specify the type of the checkpoint, such as loading or unloading, and add a new checkpoint state if needed.
-
Form: You can create a custom form for the checkpoint, such as the loading or unloading point, to capture necessary verification details, ensuring efficient data collection during the job process.
-
-
-
The form that you create within the designated company and branch will be available for selection in the list. To add Form, click here.
-
-
-
-
Location: The address of the checkpoint will be displayed in this field.
-
Select the Radius of the checkpoint.
-
Add as Address: Select this option if you want to add the location as an address.
-
-
-
-
-
-
-
Click on Save to add the checkpoint.
-
- Click on Multiple Checkpoint, If you want to add multiple checkpoint at once. the following pop up will open.

- From the Checkpoint option, select the required address from the available dropdown list.
- You can arrange the order of checkpoint by clicking on the following icon
 .
.
-
-
Please Note: The user needs to add address, before using the Multiple checkpoint option.
To Add Checkpoints in Bulk
-
Click on the Upload button.

-
-
Download the sample file using the provided link, complete the necessary information in the specified format, and then upload the completed file.
-
Check the box if you want to Add the checkpoint locations as Address.
.png?width=668&height=206&name=Frame%20639%20(17).png)
-
Click on Save to add the checkpoints.
-
-
Click on the Save 💾 icon to save the entire job.
To Create Job from Live Tracking Screen
-
Users can conveniently create a job directly from a tooltip widget located on the live tracking screen, enhancing the efficiency of the job assignment process.
.png?width=196&height=120&name=Frame%20639%20(19).png)
-
To create a job, simply click on the ➕ Job button, and a job configuration window will appear. You can then proceed to follow the job creation steps outlined earlier in this document.
-
To Create Job from Playback
-
To add a job for the current playback, the user has the ability to do it directly from the Playback screen on Live Tracking. This feature allows for real-time job assignment based on the ongoing route of the vehicle, enhancing operational efficiency.
.png?width=524&height=66&name=Frame%20639%20(21).png)
- To initiate the job creation process, simply click on the Create Job icon, as indicated in the image above. This action will open the job configuration screen, utilizing the current playback as the designated route for the job.
To Add Expense for Job
- The system allows you to incorporate expenses associated with the job, enabling comprehensive tracking and management of costs. For detailed instructions, refer to the Adding Expenses section.