
The geofence to geofence trip report works on alert configuration.
If the geofence alert is not configured in your account, there might be an issue due to which the report will not get generated.
Apart from that vehicle needs to visit the geofence.
To get the geofence to geofence trip report, first, you need to check the configuration.
To get started
-
Login to your account
- Go to Tracking
- Click on the Geofence icon
 to Add Geofence.
- Click on the Geofence icon
Navigate to Custom

-
-
Select the Company from the drop down list in which you need to create Geofence.
-
Enter the Name of the Geofence as per your requirement.
-
Select the Category of the Geofence as Area from the drop down list.
-
Select the Geofence Group from the drop down list, if any or add new.
-
Select the color of the Geofence from the Color Picker for your identification.
-
Select the Tolerance in meters from the drop down list as per the Geofence area boundary.
-
Enter a Description if required.
-
On the Map, search and select the Location of your choice.
-
Draw a Geofence and select area category in either a Polygon, Rectangle or Circle shape as per your requirement.
Polygonal Geofence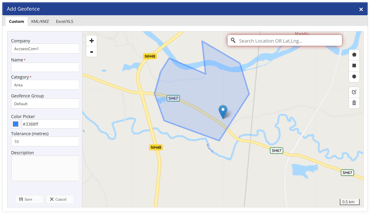
Rectangular Geofence: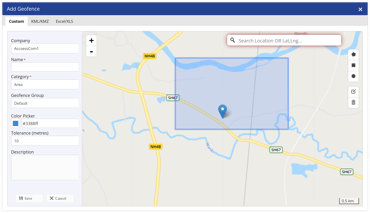
Circular Geofence: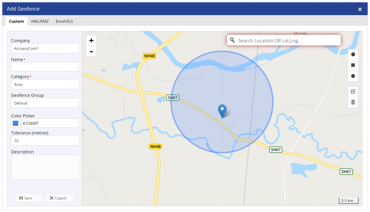
-
-
Click on the Save 💾 icon.
To get the Geofence to Geofence trip report
-
Navigate to Reports > Geofence-Address > Geofence to Geofence Trip Summary

-
-
-
-
-
-
Click on the Download button on the taskbar.
-png.png?width=182&height=65&name=Frame%20230%20(1)-png.png)
-
-
-
-
-
-
-
-
-
-
A file with XLS extension gets downloaded.

-
Also, you can download this report in PDF.
-png.png?width=179&height=64&name=Frame%20230%20(2)-png.png)
-
-
-
-
-
If all the above steps are done and you are still facing the issue, kindly raise a ticket for support.
How to raise a ticket on support?