Using Customization, the user can modify the Login Page of the application and the Theme of the platform as per requirement.
In the customization of Login Page, user can modify the Application identity (Application name, domain name, page name), Logo, Background, Login Form, Login Footer, Button Beauty, Application Link, Language for Login page and the default language of the application.
In the customization of Theme, the user can modify the theme of the platform as per their requirement. Select from the predefined themes or make a custom theme for the application.
To Customize the Application:
- Log in to your account.
- On the Left-Side Panel below the logo, find User.
- Click on User > Customization.
.png?width=178&height=364&name=Frame%20665%20(6).png)
-
- Click on Login Page to customize the login page.
-png.png?width=300&height=81&name=cust-1%20(1)-png.png)
- Choose from the various categories of the login page to tailor the page to your preferences.
- Click on Application Identity.

- Click on Set Application Icon and upload the desired application icon.
- Enter the Application Title: This will be displayed as the name on the browser tab.
- Enter the Application Domain: Specify the domain for the application.
- Enter the Page Name: Provide the name for the application page.
- Click on Application Identity.
- Choose from the various categories of the login page to tailor the page to your preferences.
- Click on Login Page to customize the login page.
-
-
-
- Click on Logo.

- Click on the Disable Logo button to remove the logo.
- To set the logo:
- Click on Select Logo Image and upload the desired logo.
- Enter the Logo Title.
- Use the slider to adjust the Logo Width and Space Width in pixels.
- Click on Logo.
-
-
-
-
-
- Click on Background.

- Click on Background.
-
-
-
-
-
-
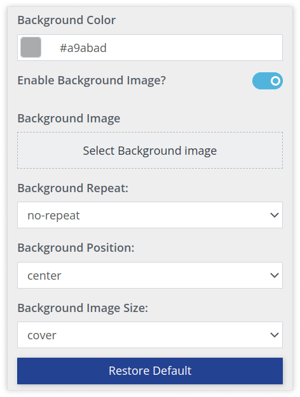
- Set the Background Color using the color picker.
- Click on the Enable Background Image button to activate the background image.
- Click on Select Background Image and upload the desired image.
- Select the Background Repeat, Background Position, and Background Image Size from the dropdown lists.
-
-
-
-
-
-
- Click on Customize Login Form.

- Set the Form Background Color as desired.
- Use the slider to adjust the Form Width, Form Minimum Height, Form Radius, and Form Shadow in pixels.
- Enter the Form Padding values (top, right, bottom, left) as required.
- Select the appropriate Border details for the form.

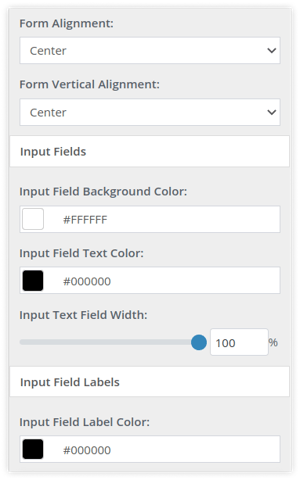
- Select the Form Alignment and Form Vertical Alignment from the dropdown menu.
- Use the color picker to set the Input Field Background Color and Input Field Text Color.
- Use the slider to adjust the Input Text Field Width in percentage.
- Use the color picker to set the Input Field Label Color.
- Click on Customize Login Form.
-
-
-
-
-
- Click on Customize Login Footer.

- Click on Customize Login Footer.
-
-
-
-
-
-
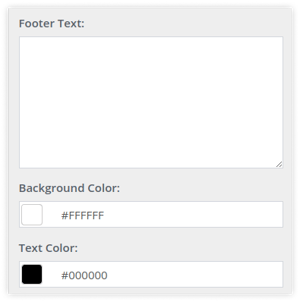
- Enter the Footer Text as desired.
- Use the color picker to set the Background Color for the footer.
- Use the color picker to set the Text Color for the footer.
-
-
-
-
-
-
- Click on Button Beauty.

- Use the color picker to set the Button Color, Button Border Color, Button Hover Color, Button Border Hover Color, Button Box Shadow, and Button Text Color.
- Use the slider to adjust the Button Width in percentage.
- Use the slider to adjust the Button Radius in pixels.
- Select the Button Alignment from the dropdown menu.
- Click on Button Beauty.
-
-
-
-
-
- Click on Mobile Application Link.

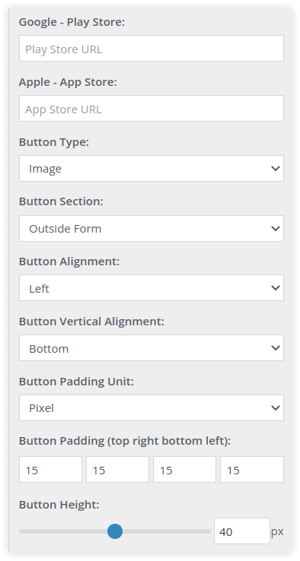
- Enter the Google Play Store and Apple App Store URL as required.
- Select the following options from the dropdown list:
- Button Type
- Button Section
- Button Alignment
- Button Vertical Alignment
- Button Padding Unit
- Enter the Button Padding values (top, right, bottom, left) as required.
- Use the slider to adjust the Button Height in pixels.
- Click on Mobile Application Link.
-
-
-
-
-
- Click on Language.

- Select Language for Login Page from the dropdown list.
- Select the Default Language for Application from the dropdown list.
- Click on Language.
-
- Click on Themes to change the theme of the application.

- Select the theme of your choice from the predefined themes.

- Select the theme of your choice from the predefined themes.
-
-
-
- To customize a theme:
- Select Custom from the grid.

- Use the color picker to set the Menu Color, Submenu Color and Icon Color.
- Click on the Texture button to enable the texture and select the desired texture.
- Use the color picker to set the Titlebar Color and Bottom Icon Color.
- Select the Titlebar Text Color from the dropdown list.
- Select Custom from the grid.
- To customize a theme:
-
-
-
-
- Click on the Apply button to save the settings.

-
