
The object tab provides a comprehensive overview of all objects associated with the logged-in account, organized by their current status—such as Running, Stopped, Idle, and Inactive. This tab also presents essential details, including the object number, name, speed, driver information, the timestamp of the last data update, the status of connected ports, etc., all conveniently displayed in one location.
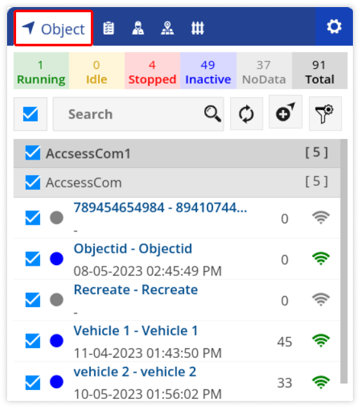
To view the object tab, go to Listing Panel > Object tab.
The object tab includes a variety of essential features and details:
Object Status
Object status is displayed in a color-coded form on the vehicle status bar. Below given is the image of the object status bar, which shows the number of vehicles in each category:

To refine the results displayed in the object list, users can simply click on the status indicator to filter and view vehicles that fall within that specific status category.
Search/Add Object
From here, a user can perform actions on the objects.

Below given are the actions that can be performed:
- Select/Unselect all objects: By clicking on the checkbox, a user can select or unselect all the vehicles at once.
-
Search Object: Using the search box, the user can easily search for specific objects by IMEI, Registration, Object Model, Sim Number, etc.
-
Add Object: By clicking on the add object button, the user can add new objects directly from the Live Tracking Screen. To learn how to add an object, click here.
-
Filter: The user can filter objects on the basis of Company-Branch, Object Group, Reminder, Object Type or Mode of the object using the filter option.
Object Information
Users can conveniently access comprehensive details about each object in a single location.
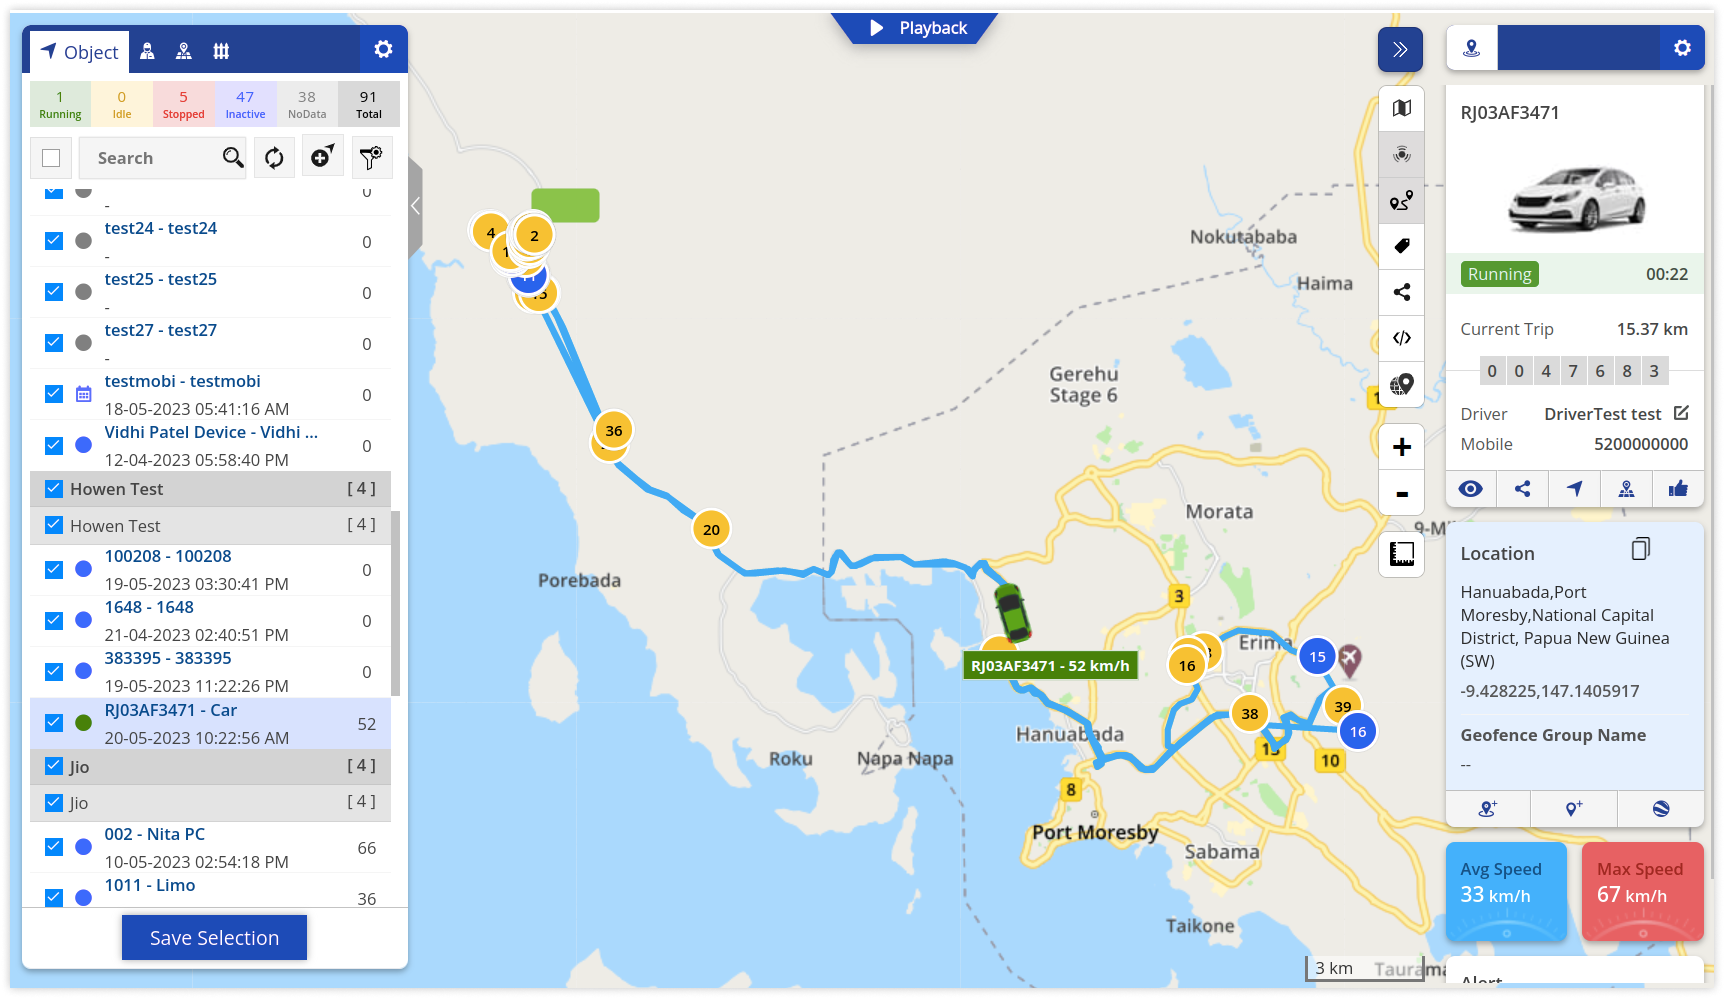
Upon selecting a specific vehicle, the relevant screen will be displayed as shown in the following image:
The following details can be accessed and viewed in the object information list.
These parameters will be shown according to the specific selections made by the user from the object list setting.
-
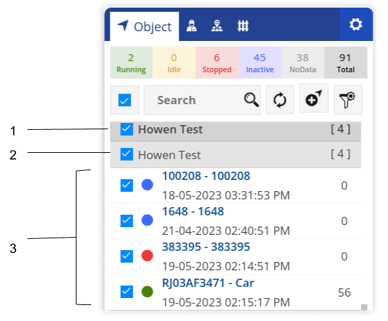
Company Name: Displays the name of the company associated with the object.
-
Branch Name: Displays the branch to which the object is assigned.
-
Object List: The list of all the objects along with their details are displayed.
The object list displays the below-given details:.png?width=688&height=128&name=Frame%20639%20(31).png)
-
Object Status: Below given is the color code that denotes the status of that object:

Running
Vehicles with their Ignition ON and are in a moving state.
Idle
Vehicles with their Ignition ON but are not in a moving state for a specified period of time.
Stopped
Vehicles with their ignition OFF.
Inactive
Vehicles that have not sent any data to the server for specified period of time.
No Data
Vehicles that have not yet sent any live data to the server. - Object Number: Displays the license plate number or the unique identification number assigned to the object.
-
Object Name: Displays the specific name assigned to the object.
-
Last Data Updated: The timestamp indicating the latest data received from the device and updated on the server.
-
Speed: This indicates the current speed of the vehicle.
- Driver Name: The name of the driver assigned to the vehicle.
- Driver Number: The contact number of the driver assigned to the vehicle.
- Mode: Displays the current status of the object, indicating whether it is operational ("Good to Go"), has experienced a breakdown, or has been involved in an accident.
-
TimeLine Chart: Displays a Timeline Summary of an object for the selected date and time range, providing details such as time-specific vehicle status, fuel consumption, work activity, distance traveled, mileage, fuel cost, and other key metrics.
-
No. of passenger seats: The number of passenger seats in that object is displayed.
- Live Streaming: This icon allows users to access live streaming for video telematics-enabled devices.
- Snapshot: This icon allows users to access the snapshot feature for video telematics-enabled devices.
- Playback: This icon allows users to access the history video playback for video telematics devices.
- Reminder: A calendar icon indicates any upcoming, due, or overdue reminders for the current day. Users can acknowledge the reminders directly through this icon.
- Note: Users have the ability to access and manage notes through this icon, facilitating efficient organization and tracking of important information.
- Send Command: Users have the capability to send SMS or GPRS commands to the device using this icon.
- Max. Load Capacity: The maximum load capacity of the object is displayed.
- Favourite Reports: The reports marked as favorites will be accessed with this icon.
- Object Health: Users can monitor the health status of Elock devices through this icon.
In addition to the above parameters, the following are the Sensor ports are displayed with their status: Green when ON, Red when OFF, and Grey is the port is not attached.
The ports enabled through the object tooltip settings, according to user preferences, will be displayed.
| GPS | |
| Health Monitor | |
| Air Conditioner | |
| Ignition | |
| Power | |
| Seat Belt | |
| SOS | |
| Buzzer | |
| Door | |
| Sweeper | |
| Chiller | |
|
Engine |
|
|
Immobilizer |
|
| Vibration | |
| External Low Battery |
Remaining all the parameters depend on the data received from the GPS device.
Object List Setting
Users can customize the object listing by selecting which specific details they wish to display with this setting. This personalization enables them to adjust the parameters according to their individual needs and preferences.
-
Go to Listing Panel > Object tab >
 to customize the parameters that users want to view in an object list.
-
Once you click on the Settings button, a window opens on the right side of the screen as below:
.png?width=242&height=676&name=Frame%20654%20(94).png)
-
Select the preferred parameters, and then click on Save.
Please Note: The "Object List Settings" icon will only appear if the parent user has given permission for it. This ensures that only authorized users can access and modify settings, enhancing security. Check how you can manage rights.
Tooltip
When a user clicks on an object from the list, a customizable tooltip will appear on the right side of the screen, displaying various widgets with details related to the object's parameters.
The tooltip is as shown in the below image:
.png?width=161&height=540&name=ol%20(1).png)
To know more about Tooltip, click here.
Playback
At the top center of the screen, there's a playback feature that lets users watch the selected object's movements or activities during a specific time period.
Playback is as shown in the below image:
.png?width=688&height=354&name=ol1%20(1).png)
To know more about Playback, click here.
Upon selecting a specific object, the Traveled path of that vehicle for the current day will be displayed on a map, giving you a clear view of its journey.