
The system empowers users to effectively oversee their tire inventory by facilitating the direct addition of tire records onto the platform. A tire must be entered into the system before it can be assigned to a vehicle.
Users have the flexibility to upload records either individually or in bulk. Transitioning from traditional manual record-keeping to a digital format significantly enhances the ability to swiftly access, organize, and manage tire data.
Users can also download these tire details.
To Get Started
- Log in to your account.
- Go to Settings > Tire > Tire.
Upon clicking on the Tire option, you will be directed to the Tire Overview page, where you can view all your tire records.
Watch : How to add tire in inventory.
To Add Tire Individually
- Click on the ➕ button on the taskbar.
-png.png)
- Choose the appropriate Company and Branch from the dropdown list to designate where you would like to add the Tire record.
- Select the Tire Brand from the drop-down list.
- Select the Tire Model from the drop-down list.
- To add New model, click on the, Add New option.
- In Model Name, enter the name for the tire model.

- In Model Name, enter the name for the tire model.
- To add New model, click on the, Add New option.
- Enter the Tire serial number.
- Enter the RFID Tag number, if necessary.
.png?width=491&height=529&name=Frame%20654%20(57).png)
-
-
Select the Manufacture Date of the tire from the date picker.
- Specify the Size of the tire.
- Provide the details of the Tread Pattern.
- Select the Tire Purchase Date from the date picker.
- Specify the Price of the tire.
- Thread pattern are not listed by default, user needs to add them.
- Click on Add New option to add the thread pattern.
- In Tread pattern, enter the name of the pattern.

- In Tread pattern, enter the name of the pattern.
- Select the Tire Purchase date from the calender.
- Specify the Price for the tire.
-
-
- Provide the measurement for the Tread Depth(mm).
- In Tire Predicted distance, Enter the estimated or anticipated Distance the tire is expected to travel.
- Select the Tire Condition from the checkboxes that state the current condition of the tire and help in the records.
- Select New, for newly purchsed tire.
- Select Retreaded, if the tread of the tire has been remade or replaced.
- Select Repaired, if repairs were made on damaged tire.
- Select Re-grooved, if the tire grooves have been deepened or cut again to extend the tire’s usable life
- In Tire Distance, spedify the distance that the tire has already travelled.
- From Upload Image, use can upload the tire image.
- In Load Index, Mention the numeric code that represents the maximum weight a tire can carry when properly inflated.
Load Index For Reference.
- In Ply Rating, enter the value that indicates the strength and load-carrying capacity of a tire
-
Examples:
-
4 PR – Light-duty vehicles
-
6 PR – Medium load capacity
-
8 PR / 10 PR – Heavy-duty vehicles such as trucks and buses
-
-
-
- Click on the Save 💾 icon.
- Click on the Save 💾 icon.
Watch : Howto bulk upload tire inventory.
To Upload Tire in Bulk
-
Click on the upload button on the taskbar. A new tire bulk upload window opens.

-
-
Choose the appropriate Company and Branch from the drop-down list under which you would like to add the Tire record.
-
Select the Tire Brand from the drop-down list.
-
Select the Tire Model from the drop-down list or add a new model.
- To add New model, click on the, Add New option.
- In Model Name, enter the name for the tire model.
- In Model Name, enter the name for the tire model.
- To add New model, click on the, Add New option.
-
-
-
Download the sample file from the link given. The file will hold the basic information about the tire, such as Serial number, Manufacture Date, RFID Tag, Tire Size, Tread Pattern, Tread Depth, etc
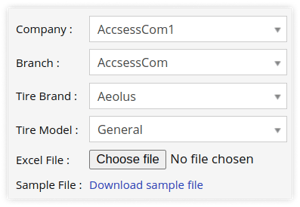
-
-
-
Once you have completed filling in the required details, proceed to Upload the file with Choose file option.
-
Click on the Save 💾 icon.
-
To Download Tire Records
- Click on the Download button on the taskbar.

- A file with an XLS extension gets downloaded.

- You can share this file with others or utilize it as needed for your specific requirements.