A Tariff Plan is used to define the pricing structure for vehicle licensing or subscriptions. It allows you to set specific rates based on vehicle usage, service types, or subscription duration.
The Tariff Plan consists of two distinct types: Prepaid and Postpaid.
Prepaid
-
In a Prepaid plan, the user is required to make a payment first upfront before gaining access to the platform.
- These plans can be structured with tiers for Monthly, Quarterly, Half-Yearly, and Yearly options, tailored to align with various platform versions (Lite, Standard, and Premium), allowing for appropriate price configuration.
-
For existing vehicles that already have plans, users have the option to upload an Excel file containing the expiry date details. These vehicles will expire on the specified dates and can be recharged accordingly.
-
When a new vehicle is added, the corresponding tariff plan will automatically be applied to that vehicle.
-
The user will receive a notification at the specified email address a few days prior to the expiration date, based on the number of days selected.
-
Free days may also be offered according to user preferences.
Please Note: If the vehicle is not recharged prior to its expiration, the tracking functionality for that vehicle will be deactivated for the user.
Watch : How to create prepaid tariff plan.
Postpaid
-
In a Postpaid plan, the user is granted access to the platform initially and is then billed for the services utilized.
- The pricing for the postpaid plan should be defined on a per-day basis.
Please Note: The duration of a Postpaid plan is fixed, i.e., for 30 days. After 30 days, the account expires. To reactivate the account, the user must complete the payment process.
-
Taxes may be applied to the plans as either a percentage or a fixed amount, depending on the specific requirements and applicable regulations.
-
For example, in India, 18% GST is applicable, so that can be added in the Tax section.
-
Additionally, users have the option to incorporate Payment Gateway Charges. This feature becomes applicable if Payment Gateways have been configured within the user's account settings. These charges may be applied as either a percentage or a fixed amount and can be structured as either a flat rate or based on specific slabs.
Watch : How to create Postpaid tariff plan.
To Get Started
- Log in to your account.
- Go to Settings > Billing > Tariff Plan.
Upon clicking on Tariff Plan, you will be navigated to the Tariff Plan Overview page, where you can explore the details of all available tariff plans.
To Create a Tariff Plan
-
Click on the ➕ button on the taskbar.

Navigate to General
-
- Select the user Reseller or Company you want to create a Tariff Plan for.
- Select the Billing Type.
- Prepaid:
- Select the Reseller or Company account based on your selection in Tariff Plan for field.
- You can use the Copy From option to easily replicate the configuration of an existing tariff plan. This feature enables users to duplicate settings from previously created plans, simplifying the process of adding similar tariff plans without the need to recreate the configuration from scratch.
.png?width=499&height=531&name=Frame%20654%20(41).png)
- Prepaid:
-
-
- Please specify a descriptive Tariff Name to facilitate easy identification and management of your plans.
- Select the Payment Gateway of your choice for online payment.
-
The Payment Gateway will be visible only if it has been configured within the chosen Reseller or its Admin account. Lean how to configure Payment Gateway.
-
-
-
- Select the preferred Currency Unit from the drop-down list.
- Notify Before: Provide the number of days for prior notification of the expiration of the tariff plan. The user will be notified of the expiration of the vehicle before the number of days entered in this field.
- Notify Email: Provide the email address where an email regarding the expiration of the tariff plan should be sent.
-
Select the Free Days from the dropdown to specify the number of days a vehicle can be used without incurring charges.
- Email Recipient: Enter the email address where emails regarding successful client payments should be sent.
- Auto Delete: Select this checkbox if you want the vehicle to be automatically deleted upon the expiration of the tariff plan.
- Excel upload: Download the sample file provided via the link.Kindly fill in the vehicle number and expiry date as instructed in the file. After completing these details, upload the file by selecting the Choose File option.
-
-
Please Note:
- The Excel upload option is available when adding a vehicle to the platform for the first time and is necessary to maintain its existing plan. This feature allows users to upload the vehicle's current expiry date. Please note that this option can only be utilized once during the initial creation of the tariff plan.
- The Expiry date will not be updated for the vehicles in NO DATA and it will only be updated when the vehicle becomes active on the platform.
-
-
-
- Upload the Terms and Conditions file if required.
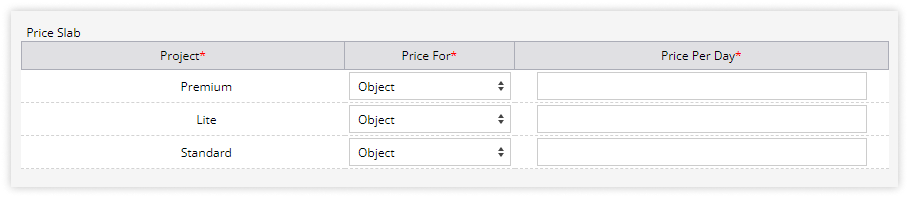
- Enter the prices in the Price Slab tabs as per requirement.
-
-

-
-
- Postpaid:
.png?width=398&height=458&name=Frame%20654%20(39).png)
- Select the Reseller or Company account based on your selection in Tariff Plan for field.
- You can use the Copy From option to easily replicate the configuration of an existing tariff plan.
- Please specify a descriptive Tariff Name to facilitate easy identification and management of your plans.
- Select Payment Gateway of your choice for online payment.
- Select the preferred Currency Unit from the drop-down list.
- Notify Email: Provide the email address where an email regarding the expiration of the tariff plan should be sent.
- Email Recipient: Enter the email address where emails regarding successful client payments should be sent.
- Bill Due Days: This refers to the number of days provided to a user to clear their pending payment or bill after the bill/invoice is generated. It defines the grace period within which the payment must be made to avoid disruptions.
- Upload the Terms and Conditions file if required.
- Enter the prices in the Price Slab tabs as per requirement.
- Postpaid:
-
Navigate to Tax
-
- Click on the Add Tax ➕ button.

-
- Type: Choose the appropriate option of tax type from the list: Tax (Percentage) or Fixed Charge (Amount).
- Enter Name for the tax.
- Enter the Charge of the tax.
- Click on the Add Sub Tax ➕, if required to add sub tax charges.
- Enter Sub Tax Name.
- Enter Sub Tax Charge.
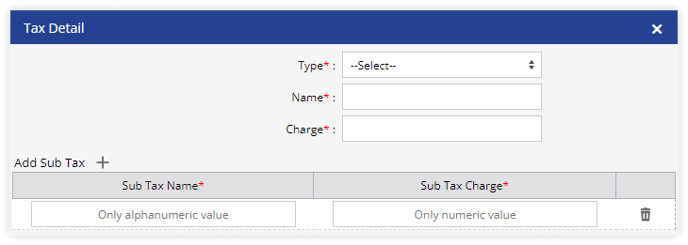
- Click on the Add Tax ➕ button.
-
-
- Click on the Save 💾 icon.
-
Navigate to Gateway Charges
-
- Click on the Add Gateway Charges ➕ button to add payment gateway charges.
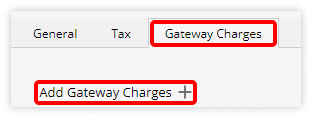
- Click on the Add Gateway Charges ➕ button to add payment gateway charges.
-
-
- Select the Gateway from the dropdown list.
- Choose the appropriate Type from the dropdown list, selecting either Amount or Percentage as needed.
- Enter Name for the Gateway charge.
- Consider By: Select the method by which the charge should be calculated.
- Fix: Enter the Charge.
- Slab: Enter the Sub Gateway Charges Slab wise.
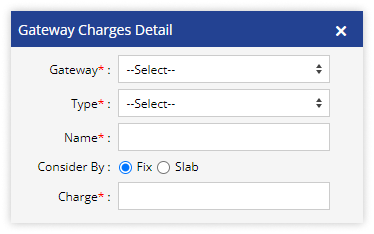
- Click on the Save 💾 icon.
-
- Click on the Save 💾 icon to save the Tariff Plan.