
The Driver Tagged alert is used to notify users when a driver is tagged or untagged from a vehicle. This alert helps fleet operators monitor driver-vehicle assignments, maintain accurate driver allocation records, and track changes in vehicle usage. 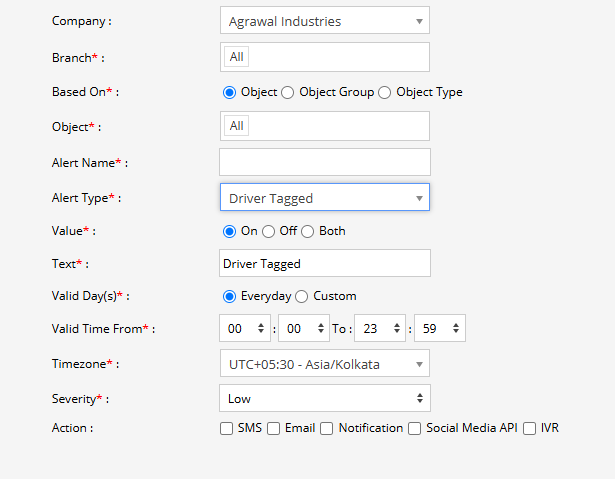
Parameters Considered (Prerequisites)
- Driver Assignment: The selected vehicle must support driver tagging or driver-vehicle association.
- Driver Tagging Data: The system must receive the corresponding driver tagging or untagging event.
- Driver Information: A driver must be available in the system for tagging to the selected vehicle.
How to Configure
- Select the correct Company and Branch for whom the alert is to be configured.
- Based On: Choose what you want to base the alert configuration on (Object, Object Group, Object Type).
- Object: Select individual vehicles/objects for whom you want the alert to generate.
- Object Group: Select a group of vehicles/objects for whom you want the alert to generate.
- Object Type: Select a vehicle or object type for whom you want the alert to generate.
- Select the Object based on the previous step selection.
- Set an Alert Name for identification of the alert.
- Select the Alert Type as Driver Tagged.
- Under Value, select when the alert should be triggered:
- On: The alert will be triggered when a driver is tagged or assigned to the vehicle.
- Off: The alert will be triggered when the driver tagging is removed or the driver is untagged from the vehicle.
- Both: The alert will be triggered for both driver tagging and untagging events.
- In the Text field, enter the message that will be displayed when the Driver Tagged alert is triggered.
- Select the Valid Day(s) as Everyday or Custom.
- Everyday: The alert will be triggered every day when the configured driver tagging condition occurs.
- Custom: Select the specific days on which you want this alert to be triggered.
- Enter the Valid Time From and To. The alert will be generated only within the selected time range.
- Select the required Timezone.
- Select the Severity of the alert (Low, Medium, or High).
- Under Action, select the medium through which the alert or notification should be sent (SMS, Email, Notification, Social Media API, or IVR).
- SMS: To receive the alert by SMS, enable the checkbox and enter the required phone numbers.
- Email: To receive the alert by email, enable the checkbox and enter the email recipients.
- Notification: To receive the alert as a system push notification, enable the checkbox and select the users who should receive it.
- Social Media API: To receive the alert through WhatsApp or Telegram, enable the checkbox and configure the required gateway and recipient details.
- IVR: To receive the alert through an automated voice call, enable the checkbox and enter the required phone numbers.
- Click the Save 💾 icon to save the alert configuration.
Please Note: To receive alerts through SMS, Email, Social Media API, or IVR, the respective API/gateway must be configured at the Admin, Reseller, or Company level.
Example
If Value is set to On, when a driver is tagged to a vehicle, the Driver Tagged alert is triggered and the selected users receive a notification. If Off is selected, the alert is triggered when the driver is untagged. Selecting Both generates alerts for both events.