
The Custom Alert (Connection Type – Digital Input) allows users to create personalized alerts based on additional hardware connections or inputs configured through the Digital Input ports of the GPS tracking device. This alert is useful for monitoring specific events or activities that are not available as predefined alert types, such as a custom switch, external sensor, or auxiliary equipment connected to an additional wire through the device's digital input. 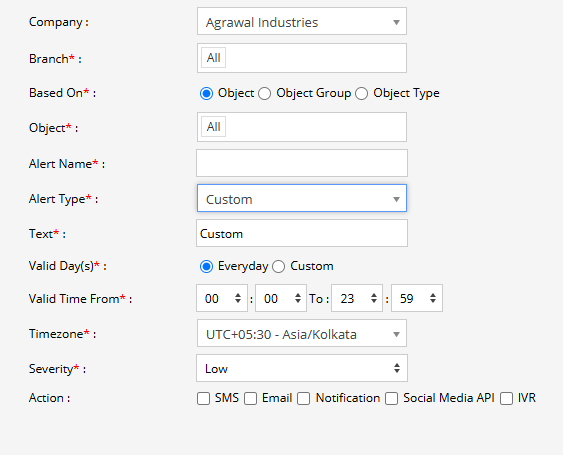
Parameters Considered (Prerequisites)
- Digital Input: The selected GPS tracking device must support digital input connections.
- Hardware Connection: The required switch, sensor, or auxiliary equipment must be physically connected to a supported digital input of the tracking device.
- Digital Input Data: The tracking device must transmit the corresponding digital input status/event to the system.
Please Note: The digital input and connected hardware must be correctly configured on the tracking device for the custom alert to work as expected.
How to Configure
- Select the correct Company and Branch for whom the alert is to be configured.
- Based On: Choose what you want to base the alert configuration on (Object, Object Group, Object Type).
- Object: Select individual vehicles/objects for whom you want the alert to generate.
- Object Group: Select a group of vehicles/objects for whom you want the alert to generate.
- Object Type: Select a vehicle or object type for whom you want the alert to generate.
- Select the Object based on the previous step selection.
- Set an Alert Name for identification of the alert.
- Select the Alert Type as Custom.
- In the Text field, enter the message that will be displayed when the custom digital input event is detected.
- Select the Valid Day(s) as Everyday or Custom.
- Everyday: The alert will be triggered every day when the configured digital input condition is detected.
- Custom: Select the specific days on which you want this alert to be triggered.
- Enter the Valid Time From and To. The alert will be generated only within the selected time range.
- Select the required Timezone.
- Select the Severity of the alert (Low, Medium, or High).
- Under Action, select the medium through which the alert or notification should be sent (SMS, Email, Notification, Social Media API, or IVR).
- SMS: To receive the alert by SMS, enable the checkbox and enter the required phone numbers.
- Email: To receive the alert by email, enable the checkbox and enter the email recipients.
- Notification: To receive the alert as a system push notification, enable the checkbox and select the users who should receive it.
- Social Media API: To receive the alert through WhatsApp or Telegram, enable the checkbox and configure the required gateway and recipient details.
- IVR: To receive the alert through an automated voice call, enable the checkbox and enter the required phone numbers.
- Click the Save 💾 icon to save the alert configuration.
Please Note: To receive alerts through SMS, Email, Social Media API, or IVR, the respective API/gateway must be configured at the Admin, Reseller, or Company level.
Example
An external switch is connected to a vehicle's Digital Input port to monitor a specific auxiliary function. When the switch changes to the configured state, the tracking device sends the digital input event to the system. The Custom alert is triggered, and the configured users receive a notification, allowing them to monitor an event that is not covered by the system's predefined alert types.