
The Add Driver feature allows users to create and manage driver records directly from the mobile application. Users can enter the driver's personal and professional details, upload required documents, and save the driver information without accessing the web application.
To Get Started
- Login to the Mobile application using your credentials.
- Go to the Settings
 screen.
 - Click on Driver.
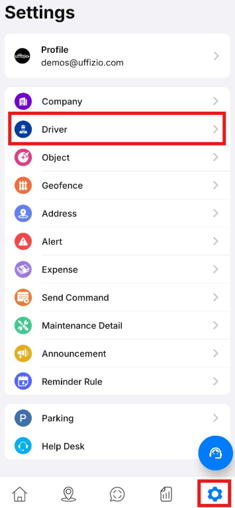
Please Note: After selecting the Driver option , user will be directed to the driver overview screen, where you can manage all existing driver.
To Add Driver
-
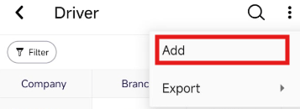
Click on the
 icon on the top right corner of the screen.
 -
Click on Add.
-
Company: Select the company under which the driver needs to be added.
-
Branch: Select the branch to which the driver belongs.
-
First Name: Enter the driver's first name.
-
Last Name: Enter the driver's last name.
-
Employee Number: Enter the unique employee identification number assigned to the driver.
-
Select the appropriate option from the Tag Via field to specify how the driver will be associated with the object, such as Beacon, RFID/IButton, or Face ID.
-
Based on the selected Tag Via option, enter the corresponding RFID/IButton Tag, Beacon Tag, or Face ID details. in the designated field.
-
-
Shift Group: Select the shift group assigned to the driver. The shift group helps organize drivers based on their assigned working schedules.
-
Shift: Select the specific shift assigned to the driver.
-
Country: Select the country associated with the driver's address.
-
State: Select the state or region associated with the driver's address.
-
City: Enter or select the city where the driver is located.
-
Zip Code: Enter the postal or ZIP code of the driver's address.
-
Street1: Enter the primary street address of the driver.
-
Contact Number1: Enter the driver's primary contact number.
-
Contact Number2: Enter an alternate contact number for the driver, if applicable.
-
Email Id: Enter the driver's email address.
-
Default Object Number: Select the default object or vehicle assigned to the driver. This object will be associated with the driver as the default vehicle.
-
Driver as User: Enable this option to create login credentials for the driver to access the Driver Mobile App. When enabled, the User Settings option is displayed, allowing you to configure the driver's login credentials.
-
Active: Select this option to indicate that the driver is currently active and working with the company. Disable the option if the driver is no longer actively working with the company.
-
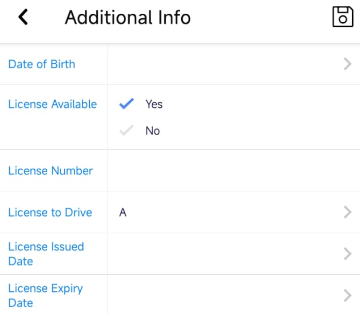
Navigate to Additional Info
-
Date of Birth: Select the driver's date of birth.
-
License Available: Select Yes if the driver has a valid driving license. Select No if the driver does not have a driving license.
- If Yes is selected.
-
License Number: Enter the driver's driving license number.
-
License to Drive: Select the license category or vehicle type that the driver is authorized to drive.
-
License Issued Date: Select the date on which the driving license was issued.
-
License Expiry Date: Select the date on which the driving license expires.
- Click on the Save 💾 icon.
-
- If Yes is selected.
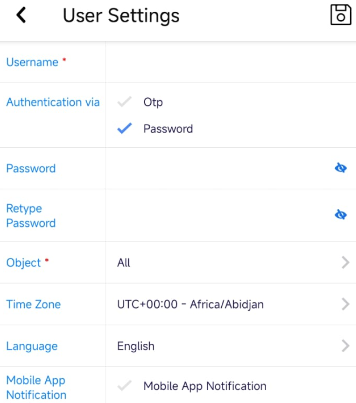
Navigate to User Settings:
-
Username: Enter a unique username that the driver will use to log in to the Driver Mobile App.
-
Authentication via: Select the authentication method to be used for driver login:
-
OTP: The driver can authenticate using a One-Time Password.
-
Mobile: Enter the Mobile Number.
-
-
Password: The driver can log in using a password. When selected, enter the Password and Retype Password to confirm it.
-
-
Mobile: Enter the driver's mobile number. This number is used for OTP-based authentication when OTP is selected.
-
Object: Select the object(s) that the driver is authorized to access. Select All to provide access to all available objects.
-
Time Zone: Select the timezone applicable to the driver. The selected timezone is used for displaying time-related information in the application.
-
Language: Select the preferred language for the driver's mobile application.
-
Mobile App Notification: Enable this option to allow the driver to receive notifications on the mobile application.
-
Click on the Save 💾 icon.
Navigate to Documents
- Tap on the + Icon to add the document related to company.
- Document Name: Enter a name to identify the document.
- Issue Date: Select the date on which the document was issued.
- Expiry Date: Select the date on which the document expires.
- Attachment: Upload the relevant document or image associated with the record. Supported file types depend on the platform configuration.
- Apply: Tap on apply to save the document.
- Click on the Save 💾 icon to create the Driver.