
Admins can customize various feature permissions for sub-users through the User Settings. These permissions are assigned based on the roles and responsibilities of the sub-users.
To Get Started
- Log in to your account.
- Go to Settings > General > Admin.
- Double-click on the account for which you want to configure user settings in the admin sub-user.
- Navigate to the Admin Subuser tab.
-1.png?width=670&height=56&name=Frame%20667%20(19)-1.png)
Watch : How to configure Admin subuser user setting.
To Provide Access
- Click on Add New (to create a new account) or Edit (to edit the existing account), and the Admin Subuser window will open.
- Navigate to the User Settings tab.
- Navigate to the User Settings tab.
-
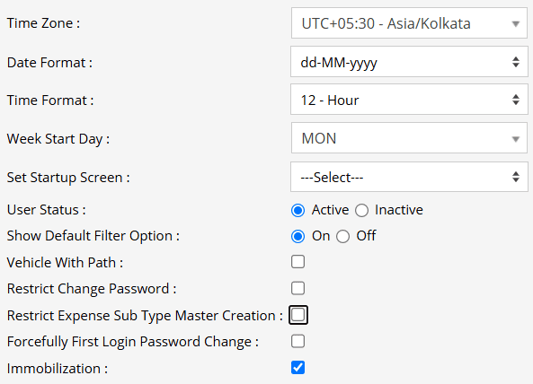
- Under the Time zone drop-down menu, select the time zone for the admin sub-user.
- Under the Date Format drop-down menu, select the preferable Date Format for the admin sub-user account.
- Under the Time Format drop-down menu, select the preferable Time Format for the admin sub-user account.
- Under the Week Start Day drop-down menu, choose the preferred start day of the week for the admin sub-user account. The application will display weekly reports based on the selected start day of the week.
- Under the Set Startup Screen drop-down menu, select the screen on which the sub-user will land after login. ie; either Dashboard or Live Tracking.
- User Status: This option indicates the current status of the sub-user's account. Additionally, the admin can activate or deactivate the account, controlling the user access as needed.
- Show Default Filter Option: You can turn on/off the "Records per page" drop-down being displayed on the bottom right of all the screens on the platform.
.png?width=221&height=60&name=Frame%20660%20(5).png)
-
- Vehicle With Path: You have the option to check the box if you would like to allow the sub-user to view the playback of objects along with their traveled paths on the live tracking screen.
- Restrict Change Password: You can restrict the sub-user to changing the password for their account by selecting this option.
- Restrict Expense Sub Type Master Creation: If this option is enabled, subuser will not be able to create new expense subtypes from the Expense screen.
- Forcefully First Login Password Change: By selecting this option, you can set the condition for sub-user to change the password for their account when they log into the account for for the first time.
- Immobilization: If you want to grant vehicle immobilization rights to the sub-user, then select the provided checkbox.
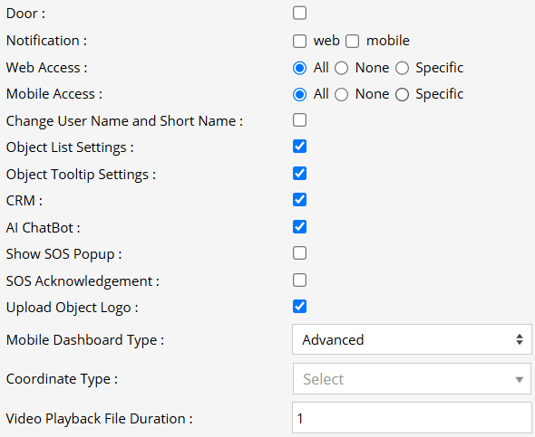
- Select the Door checkbox to grant the door permission to the sub-user.
Please Note: By checking the door checkbox, you will enable the door lock/unlock button on object tooltip widget
-
- The Notification field will allow you to grant permission to the admin sub-user to get notifications via Web platform or Mobile application.
- Web Notification Sound: This option allows you to customize the web notification sound, enabling it to play either once or repeatedly according to your preferences.
Please Note: Web Notification Sound option will be available only if the Notification for Web checkbox is selected.
-
- You can provide Web Access and Mobile Access as per your needs.
-
- If you want to give the rights to the sub-user to be able to Change User Name and Short Name then you can select the provided checkbox.
- You can grant the sub-users the ability to utilize the Object List Settings and Object Tooltip Settings available on the Tracking screen by selecting the corresponding checkbox.
-
-
- Object list Setting:
.png?width=377&height=116&name=Frame%20660%20(4).png)
- Object list Setting:
-
-
-
- Object Tooltip Setting:
.png?width=165&height=141&name=Frame%20660%20(3).png)
- Object Tooltip Setting:
- You can enable the CRM option for the user by checking this box.
- You can enable the AI ChatBot option for the user by checking this box.
- Show SOS Popup: If this option is enabled the subuser will receive the SOS popup.
- SOS Acknowledgement: If this option is enabled the user will get the SOS Popup and it will remain open until the user adds the Reason and Comment.
- Upload Object Logo: This will give the rights to upload the logo to the object.
- Mobile Dashboard Type: You can select how the Mobile dashboard should look like from standard or Advance.
- Standard Dashboard:
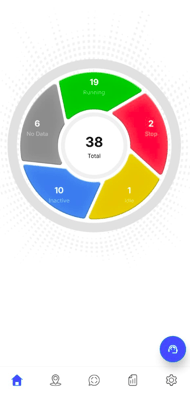
- Advance Dashboard:
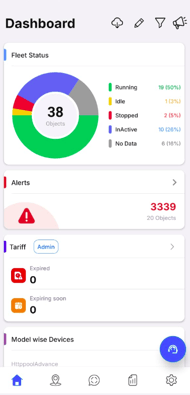
- Standard Dashboard:
-
Coordinate Type: Users can select the coordinate format they want to view.
- Latitude/Longitude: Displays the location using standard geographic coordinates (latitude and longitude).
- MGRS: Displays the location using the Military Grid Reference System (MGRS) coordinate format.
- Video Playback File Duration: The user must specify the duration (in minutes) for splitting the video playback files (File List) into separate segments.
-
- Click on the Save 💾 icon.