Job Tab on Live Tracking Screen
On the left side of the live tracking screen, there is a listing window that presents the job details. This feature allows users to monitor all jobs in a centralized location.
The Job tab provides real-time insights for tasks scheduled for the current day. Users can monitor job progress and track status updates by clicking on a specific job.
Please Note: Only jobs that are scheduled for the current day will appear in the job list on the live tracking screen. If there are no jobs for today, the Job tab will not be visible.
To view the job tab, go to Listing Panel > Job tab.
It consists of the following features and details:
Job Status Bar
Job status is displayed in a color-coded form on the job status bar. This shows the number of jobs in a particular status, as shown in the below image:

Search Job
From here, a user can perform actions on the jobs.

Below given are the actions that can be performed:
-
Search Box: Using the search box, the user can easily search the specific jobs.
-
Filter: Users have the ability to refine their job search by utilizing the Filter option, which allows them to search jobs based on criteria such as Company-Branch, Object Type, or Object State (e.g., loaded, empty, etc.).
- Job Calendar: Users can review jobs on a monthly, weekly, or daily basis, allowing them to stay informed and updated through this screen.
Job Information
The detailed job information can be viewed here in one place.
Upon selecting a specific job, the corresponding screen will be displayed as shown in the image below:.png?width=688&height=354&name=Frame%20669%20(9).png)
Following is the type of information that can be viewed in the job information list:
-
Job Name: The dedicated name of the job will be displayed.
-
Job Status: The current status of the job will be indicated just beneath the job name.
Below given are the color codes:
| Running Jobs that are ongoing or are being performed at the moment. |
|
| Completed Jobs that are already completed successfully. |
|
| Upcoming Jobs that are upcoming in the future. |
|
| Fail Jobs that were not completed successfully, hence, failed. |
-
Representative: The representatives assigned to the job will be displayed next to the job name. These are the individuals who go on the job with drivers.
-
Object Name: The dedicated name of the object to which the job is allocated will be displayed. By selecting the object name, users can access comprehensive details regarding the object.
-
Object State: The load state of the object, such as Empty, Loaded, Containerized Import/Export, etc., will be displayed as configured on the job.
-
Quantity: The quantity of items loaded onto the object will be displayed, and it will be updated dynamically based on the items delivered to the checkpoint.
-
Weight: The weight of the items loaded onto the object will be displayed and will be updated dynamically according to the items delivered to the checkpoint.
- Violation: The number of violations will be displayed here.
-
Convoy: The number of objects assigned to the convoy will be shown according to the configuration set during the job creation process.
-
Route: This will display whether the route of the job is defined or not. If it is defined, then by clicking on the icon, the route can be viewed on the map.
-
Document: Users have the ability to upload documents relevant to the job through this option.
- More: Users can access additional details about the job, including Shipment Number, Invoice Number, Quantity, Product, and more, by selecting the More option.
When users click on a specific job, they can visualize the route taken by the vehicle for that job on the map as appearing on the above image.
Job Tooltip
When the user clicks on a specific job, a tooltip opens at the bottom of the screen, providing detailed information about the job.
.png?width=688&height=110&name=Frame%20669%20(8).png)
- The information, such as the estimated and actual times for job start and completion, the number of checkpoints with their status, addresses of the checkpoints, halts, distance, duration, alerts, and more, will appear here.
- Users can also review both the Actual and Defined paths and enable the alert count tab through the options available at the top right corner of the tab.
- Additionally, by enabling the Show Alert option, users can view the count of alerts that will be displayed on the same tab.
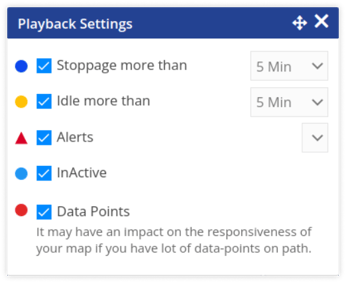
Playback Settings
When a user selects a specific job, a playback settings tab will appear in the top right corner of the screen, as illustrated in the image below:
-
Using this panel, users can customize the parameters they wish to display on the playback path while reviewing the playback data for a completed job.
