Tire Axle
Tire Axle allows users to assign tires to specific objects and define their corresponding axles. This feature enables users to conveniently input axle details into the system and subsequently download them in an Excel file format.
To Get Started
- Log in to your account.
- Go to Settings > Tire > Define Axle.
Upon clicking on the Define Axle option, you will be directed to the Tire Axle Overview page, where you can view all your tire records.
Watch : How to Configure Tire axle.
To Add Axle
-
Click on the ➕ button on the taskbar.

-
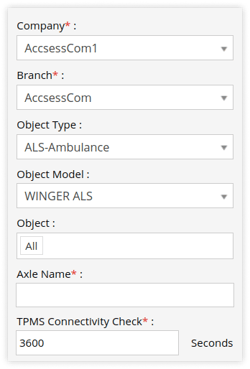
Select the Company from the drop-down list.
-
Select the Branch from the drop-down list.

-
Choose the appropriate Object Type from the drop-down menu.
-
Choose the appropriate Object Model from the drop-down list.
-
The list of objects associated with the chosen object type and model will be displayed. Please select the desired Object from the drop-down list.
-
Enter the Axle Name.
-
Enter the TPMS Connectivity Check.
-
To add an axle, simply click on the ➕ button, and to remove an axle, click on the
 button.
-png.png?width=250&height=68&name=axle-1%20(1)-png.png)
-
The axle will be added or removed in the axle diagram accordingly, as shown in the below-given image.
-png.png?width=250&height=296&name=axle-2%20(2)-png.png)
-
Click on the
 button on the axle to add tires to that axle, and click on
  button to remove tires from that axle.
 -
Specify the Tire Temperature Limit. Choose the appropriate Unit and provide the Minimum, Ideal, and Maximum temperature limits for the tires.

-
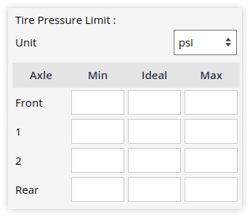
Select the Unit for Tire Pressure Limit.

-
-
- Enter the Minimum, Ideal and Maximum pressure limits for the tires in each axle.
- Click on the Save 💾 icon.
To Download Axle Records
- Click on the Download button on the taskbar.
-png.png)
- A file with an XLS extension gets downloaded.

- You can share this file with others or utilize it as needed for your specific requirements.
