
Geofences represent virtual boundaries established around designated geographical areas. These areas can include various locations, such as warehouses, delivery zones, customer territories, or restricted regions, among others.
Uses of Geofence Feature:
- Geofences can be created to monitor vehicle activity within a specific area or to oversee trips between various locations, such as loading and unloading points.
- Additionally, users can be notified when a vehicle enters or exits these designated locations.
Geofences are created by specifying GPS coordinates and defining a radius around them. They can be categorized as area, road fence, stay-in, or stay-away zones.
To Get Started
Watch : How to add geofence.
To Add Geofence from Geofence Screen
- Log in to your account.
- Go to Settings > Master > Geofence.
Upon clicking on Geofence, you will be directed to the Geofence Overview page, where you can view and manage all the geofence records.
To Create Geofences Individually
- Click on the ➕ button on the taskbar.

- Select the Reseller and Company from the drop-down list.
- Provide the Name of the geofence.
- Select the Category of the geofence from the drop-down list.
- For Area, Stay in Zone, Stay away from zone & Risky Area the process to create the geofence is the same.
- For Road Fence, Check below for creation process.
-
Select the appropriate Geofence Access option to define the visibility and accessibility of geofences for users:
- Public: Choose this option if the geofence should be visible to all users.
- Private: Choose this option to ensure the geofence is visible only to the user who created it.
-
Select the Geofence Group from the drop-down list to categorize the geofence based on its type or specific use case. If no suitable group exists, you can create a new one.
.png?width=245&height=636&name=Frame%20658%20(12).png)
-
- Choose the appropriate Geofence Type from the dropdown list, or if the desired type is not available, you have the option to create a new one.
- Enter the Contact No of the responsible authority of that area.
- Provide the specific Address of the geofence location.
- You can assign different colors to the geofence for easy identification by type or use case. Select the color from the Color Picker.
- Choose the Tolerance from the dropdown list, as this setting will assist in defining a radius. This will ensure accurate tracking of geofence entries and exits.
- Provide a Description if necessary to clarify the purpose or details of the geofence.
Create Area, Stay in Zone, Stay away from zone & Risky Area
- On the Map, search and select the desired Location.
- Draw a geofence in either a Polygon, Rectangle or Circle shape as per your requirement.
Polygonal Geofence: Click on Polygon icon & click on the Map to draw the geofence, the first & the last point should be the same to complete the geofence.
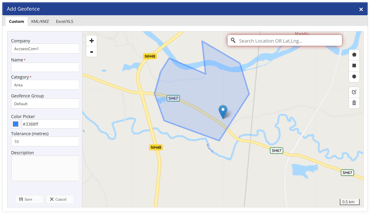
Rectangular Geofence: Select the Rectangle icon, click & drag to create the geofence.
Circular Geofence: Click on the Circle icon, click & drag to create the geofence.
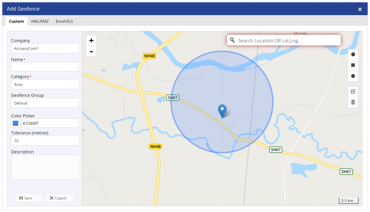
Create Road Fence.
- Road Fence uses the road visible on the map to create a geofence directly along the road. This helps in monitoring vehicles moving specifically on that road segment.
- To Draw the road fence select the Poly Line
 option.
 - Select two points on the road the system will create a geofence on the shortest path.

- For Road Fence an additional feild Speed Limit will be enabled, enter the max speed the vehicle is allowed to travel inside the geofence.
- Click on the Save 💾 icon
Watch: How to Bulk Upload Geofence.
To Create Geofence in Bulk
- Click on the Upload button on the taskbar.
-
- Select the Reseller, Company and Branch under which you want to create the geofence from the drop-down menu.
.png?width=342&height=196&name=Frame%20658%20(10).png)
- To upload a file, first you need to download the sample file from the given link. Fill in the details of geofence like type, name, category, geofence coordinates, description, tolerance and radius in the given format and then Upload the file by clicking on Choose file.
- Click on the Save 💾 icon.
- Select the Reseller, Company and Branch under which you want to create the geofence from the drop-down menu.
To Add Geofence from the Live Tracking Screen
-
Log in to your account.
-
Go to the Live Tracking screen.
-
Geofences can be created using two distinct methods from the live tracking screen:
-
Geofence Tab
-
Map Operational Panel
-
Create Geofence from Geofence tab
- Navigate to the Geofence tab.

To Create Geofences Individually
Navigate to Custom
.png?width=229&height=660&name=Frame%20658%20(13).png)
-
-
- Select the Reseller and Company from the drop-down list.
- Provide the Name of the geofence.
- Select the Category of the geofence from the drop-down list.
- For Area, Stay in Zone, Stay away from zone & Risky Area the process to create the geofence is the same.
- For Road Fence, Check below for creation process.
-
Select the appropriate Geofence Access option to define the visibility and accessibility of geofences for users:
- Public: Choose this option if the geofence should be visible to all users.
- Private: Choose this option to ensure the geofence is visible only to the user who created it.
-
Select the Geofence Group from the drop-down list to categorize the geofence based on its type or specific use case. If no suitable group exists, you can create a new one.
- Choose the appropriate Geofence Type from the dropdown list, or if the desired type is not available, you have the option to create a new one.
- Enter the Contact No of the responsible authority of that area.
- Provide the specific Address of the geofence location.
- You can assign different colors to the geofence for easy identification by type or use case. Select the color from the Color Picker.
- Choose the Tolerance from the dropdown list, as this setting will assist in defining a radius. This will ensure accurate tracking of geofence entries and exits.
- Provide a Description if necessary to clarify the purpose or details of the geofence.
-
Create Area, Stay in Zone, Stay away from zone & Risky Area
- On the Map, search and select the desired Location.
- Draw a geofence in either a Polygon, Rectangle or Circle shape as per your requirement.
Polygonal Geofence: Click on Polygon icon & click on the Map to draw the geofence, the first & the last point should be the same to complete the geofence.
Rectangular Geofence: Select the Rectangle icon, click & drag to create the geofence.
Circular Geofence: Click on the Circle icon, click & drag to create the geofence.
Create Road Fence.
- Road Fence uses the road visible on the map to create a geofence directly along the road. This helps in monitoring vehicles moving specifically on that road segment.
- To Draw the road fence select the Poly Line option.
- Select two points on the road the system will create a geofence on the shortest path.
- For Road Fence an additional feild Speed Limit will be enabled, enter the max speed the vehicle is allowed to travel inside the geofence.
- Click on the Save 💾 icon.
To Create Geofences in Bulk
Navigate to KML/KMZ
-1.png?width=256&height=588&name=Frame%20658%20(4)-1.png)
-
-
- Select the Reseller and Company from the drop-down list.
- Select the Category of the geofence from the drop-down list.
-
Select the appropriate Geofence Access option to define the visibility and accessibility of geofences for users:
- Public: Choose this option if the geofence should be visible to all users.
- Private: Choose this option to ensure the geofence is visible only to the user who created it.
- Select the Geofence Group from the drop-down list to categorize the geofence based on its type or specific use case. If no suitable group exists, you can create a new one.
- Choose the appropriate Geofence Type from the dropdown list, or if the desired type is not available, you have the option to create a new one.
- Enter the Contact No of the responsible authority of that area.
- Provide the specific Address of the geofence location.
- You can assign different colors to the geofence for easy identification by type or use case. Select the color from the Color Picker.
- Upload the KML/KMZ file by clicking on Choose File.
- Click on the Save 💾 icon.
-
Navigate to Excel/XLS
-1.png?width=313&height=351&name=Frame%20658%20(7)-1.png)
-
-
- Select the Reseller and Company from the drop-down list.
- Select the Geofence Group from the drop-down list to categorize the geofence based on its type or specific use case. If no suitable group exists, you can create a new one.
- Download the sample file from the given link. Fill in the details of geofence, like type, name, category, geofence coordinates, description, tolerance, and radius, in the given format, and then upload the file by clicking on Choose File.
- Click on the Save 💾 icon.
-
Create Geofence from Map Operational Panel
- Proceed to the Map Operational Panel, located on the right-hand side of the live tracking screen.
.png?width=74&height=579&name=Frame%20654%20(9).png)
- Click on Add Address and Geofence Mode to enable the option.
- To create geofence, simply click on the Map at your desired location. A popup will then appear, providing you the option to Add Geofence.
.png?width=419&height=199&name=Frame%20654%20(7).png)
- Click on Add Geoofence option, and the Geofence configuration screen will appear.
- Provide the necessary information as outlined in the geofence creation process to ensure successful geofence creation.
To Add Geofence from Tooltip Widget
The user can conveniently create the geofence for the current location using the tooltip widget in the live tracking screen.
- Go to the Live Tracking screen.
- Navigate to the Object tab.
.png?width=305&height=218&name=Frame%20639%20(26).png)
- Click on the Object from the object list.
- On Location tooltip widget, click on the Add Geofence option. The geofence configuration screen will open.
.png?width=212&height=198&name=Frame%20639%20(25).png)
- Select the Reseller and Company from the drop-down list.
- Provide the Name of the geofence.
- Select the Category of the geofence from the drop-down list.
- For Area, Stay in Zone, Stay away from zone & Risky Area the process to create the geofence is the same.
- For Road Fence, Check below for creation process.
- Select the appropriate Geofence Access option to define the visibility and accessibility of geofences for users:
- Public: Choose this option if the geofence should be visible to all users.
- Private: Choose this option to ensure the geofence is visible only to the user who created it.
-
Select the Geofence Group from the drop-down list to categorize the geofence based on its type or specific use case. If no suitable group exists, you can create a new one.
- Choose the appropriate Geofence Type from the dropdown list, or if the desired type is not available, you have the option to create a new one.
- Enter the Contact No of the responsible authority of that area.
- Provide the specific Address of the geofence location.
- You can assign different colors to the geofence for easy identification by type or use case. Select the color from the Color Picker.
- Choose the Tolerance from the dropdown list, as this setting will assist in defining a radius. This will ensure accurate tracking of geofence entries and exits.
- Provide a Description if necessary to clarify the purpose or details of the geofence.
Create Area, Stay in Zone, Stay away from zone & Risky Area
- On the Map, search and select the desired Location.
- Draw a geofence in either a Polygon, Rectangle or Circle shape as per your requirement.
Polygonal Geofence: Click on Polygon icon & click on the Map to draw the geofence, the first & the last point should be the same to complete the geofence.
Rectangular Geofence: Select the Rectangle icon, click & drag to create the geofence.
Circular Geofence: Click on the Circle icon, click & drag to create the geofence.
Create Road Fence.
- Road Fence uses the road visible on the map to create a geofence directly along the road. This helps in monitoring vehicles moving specifically on that road segment.
- To Draw the road fence select the Poly Line option.
- Select two points on the road the system will create a geofence on the shortest path.
- For Road Fence an additional feild Speed Limit will be enabled, enter the max speed the vehicle is allowed to travel inside the geofence.
- Click on the Save 💾 icon.
To Add Geofence from Playback Screen
To create geofences for specific stoppage points, users can easily do so from the playback screen by selecting a desired stoppage location. This functionality is particularly beneficial for frequently visited sites, allowing users to swiftly add geofence directly from the playback screen.
- Go to the Live Tracking screen.
- Navigate to Object tab.
- Click on the Object from the object list.
- Navigate to Playback screen.
-1.png?width=670&height=58&name=Frame%20654%20(4)-1.png)
- Select the specific date for which you would like to review the playback.
- Click on the desired point for which you want to create geofence. A popup will appear presenting the option to Add Geofence.
.png?width=502&height=242&name=Frame%20654%20(17).png)
- Click on Add Geofence and the Geofence configuration screen will appear.
.png?width=670&height=345&name=Frame%20654%20(21).png)
- Provide the necessary information as outlined in the geofence creation process to ensure successful geofence creation.
To Add Geofence from Reports
Users can create geofences directly from reports, enabling users to effortlessly designate frequently visited halt locations as geofences where vehicles have made previous stops.
- Log in to your account.
- Go to Settings > Reports > Select the report that includes the Map Point feature.
.png?width=670&height=210&name=Frame%20654%20(16).png)
- Click on the Map point within the report to view the specific location on the map.
- A popup window will open, displaying the pinpoint on the map for that particular location.
.png?width=670&height=457&name=Frame%20654%20(12).png)
- Select the Add Geofence option that appears in the location popup window to open the Geofence configuration screen.
.png?width=670&height=403&name=Frame%20654%20(20).png)
- Provide the necessary information as outlined in the geofence creation process to ensure successful geofence creation.
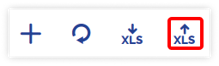
Users can also download geofence details according to their preferences.
To add geofence from the mobile application, click here.
To download geofence details from the mobile application, click here.