A Consumer User in the system refers to an account created under a specific reseller (reseller subuser)user, typically managed by a Reseller or Admin.
To Get Started
- Log in to your account.
- Go to Settings > General > Consumer.
- Click on the ➕ icon available on the bottom panel of the screen.

To Create New Account
Navigate to My Account
- Select a Reseller from the drop-down.
Please Note:
The Reseller Dropdown is displayed only when a company is created from an Admin account. If the company is created from a Reseller account, the dropdown will not appear.
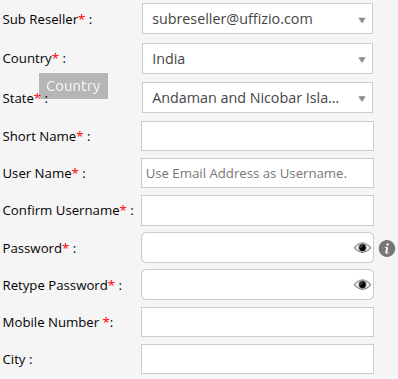
- Select a Sub Reseller from the drop-down under which you want to create the company account.
Please Note:
The Sub Reseller Dropdown is displayed only when a company is created from an Admin/Reseller account. If the company is created from a Sub Reseller account, the dropdown will not appear.
- Select the Country and State of the company from the drop-down menu.
- Add the Short Name of the company.
- Add the Username for the company account. Use an email address as a user name.
- Add the Confirm Username for the company account. the Username & Confirm Username should be the same.
- Add a Password for the company user.
- Retype the password.
Please Note:
- Password must be of at least 8 characters.
- Password must contain at least one uppercase character (A-Z), one lowercase character (a-z), and one digit (0-9) and special characters from (!,@,#,$,%,&,*,?).
Navigate to User Settings
- The User Settings section in the Company account enables users to customize the below fields according to their preferences.

- Enter the preferred Time Zone from the predefined options. The chosen timezone will be utilized to present analytics for the company account within the application.
- Click on the Date Format drop-down menu and select the preferred Date Format for the account.
- Click on the Time Format drop-down menu and select the preferred time format for the account.
Navigate to Data Access
- Select the Default Language From the Dropdown.
- Click on the Save 💾 icon.