An Alert serves as a notification that is activated in response to a specific event or condition, such as when a vehicle exceeds the established speed limit or any other condition Alerts can be set up to notify the designated personnel through various channels, such as email and text, facilitating prompt action on potential issues and ensuring regulatory compliance.
Please Note: From mobile application you can only set system push notification, all the other medium can only be configured from web portal by Admin or Reseller.
To Configure Alert from Web.
(Admin & Reseller Only)
- Log in to your account.
- Go to Settings > General > Alert.
Upon clicking on Alert, users will be directed to the alert overview screen, where they can view and manage all existing alerts.
- Click on the ➕ button on the taskbar. A new window will open.

- Choose the appropriate Consumer from the dropdown menu for which you would like to configure the alert.
-
- To select vehicles for sending alerts, choose from Vehicle or Vehicle Type in the Based On field. Based on your selection, a list of relevant objects will appear in the Vehicle field.
- Object: If you want to select different objects, then select Object.
- To select vehicles for sending alerts, choose from Vehicle or Vehicle Type in the Based On field. Based on your selection, a list of relevant objects will appear in the Vehicle field.
-
-
-
- Choose the desired Object from the dropdownlist for which you wish to send alerts.
-
-
-
-
- Object type: If you want to add an alert based on the type of object, then select object type.
- Choose the Object Type from the dropdown list for which you wish to set up an alert. The corresponding objects will be displayed in the Object drop-down menu, allowing you to choose the objects according to your requirement.
- Object type: If you want to add an alert based on the type of object, then select object type.
- Assign a descriptive Alert Name that reflects the purpose of the alert you are configuring for easy identification.
- Choose the appropriate Alert Type from the dropdown list for the alert you wish to configure.

- Choose the appropriate Value based on the selected alert type. For instance, if you wish to receive an alert when the Door is activated, select "start."
-
The options available in the Value field will differ depending on the selected Alert Type, as each alert is governed by unique conditions that define its specific criteria.
-
- The Text field will present the default content intended as the heading of the alert. You have the option to customize this text to ensure it effectively communicates the purpose of the alert.
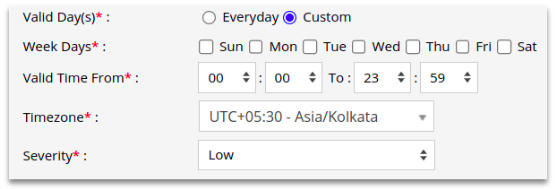
- Set the validity of when you want the alert to be generated.
-
-
- Everyday: If you want the alerts to be generated on a daily basis, then you can select every day.

- Everyday: If you want the alerts to be generated on a daily basis, then you can select every day.
-
-
-
-
- Valid Time From: Determine the specific start and end times during which you would like the alerts to be generated.
- Select the Timezone that corresponds to your location, as this will determine when the alerts are generated.
-
-
-
-
- Custom: If you want to generate alerts on some particular days, then you can select custom.
- Custom: If you want to generate alerts on some particular days, then you can select custom.
-
-
-
-
- Week Days: Choose the specific days of the week on which you would like the alert to be generated.
- Valid Time From: Determine the specific time frame during which you would like the alert to be triggered.
- Time zone: Select the preferred time zone when you want to receive the alerts.
-
-
-
-
-
- Choose the level of Severity for the alert from the dropdown menu.
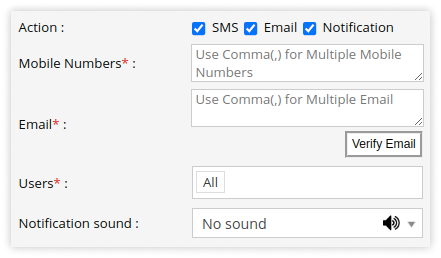
- Action: Choose your preferred method for sending alerts.
- SMS: Add the mobile number in the provided text box on which you want to send the alerts. Use a comma (,) as a separator if you are adding multiple mobile numbers.
-
Please Note: SMS Configuration is necessary.
-
-
- Email: Add the email address to which you want to send the alerts. Use a comma (,) as a separator if you are adding multiple email addresses.
Click on Verify Email to verify the entered email addresses.
- Email: Add the email address to which you want to send the alerts. Use a comma (,) as a separator if you are adding multiple email addresses.
-
Please Note:
- Email Configuration is necessary.
- When you click on Verify Email, a verification email will be sent to the addresses you provided. Please check your inbox and confirm the email to begin receiving future emails for alerts.
-
-
- Notification: To notify subusers with alerts, select Notification.
-
-
-
-
- Choose the Users from the dropdown list who should receive the notification.
- You may also choose a specific Notification sound for each alert to enhance your experience.
-
-
-
-
- Social Media API: To notify subusers with alerts through the configured Social Media API, select this option.
-
-
-
-
- Choose the appropriate Gateway from the drop-down list.
- Enter the Recipient's phone number to which the alerts will be sent. Use a comma (,) as a separator if you are adding multiple email addresses.
-
-
Please Note:
- Social Media API configuration is necessary to use the option.
- Save the configuration by clicking on the Save 💾 icon.