
Geofences represent virtual boundaries established around designated geographical areas. These areas can include various locations, such as Parking, Farm house, territories, or restricted area, among others.
Uses of Geofence Feature:
- Users can be notified when a vehicle enters or exits these designated geofence.
Geofences are created by specifying GPS coordinates and defining a radius around them. They can be categorized as area, stay-in, or stay-away zones.
To Add Geofence from Mobile Application
- Log in to your account.
- Go to Profile > Geofence.
Upon clicking on Geofence, you will be directed to the Geofence Overview page, where you can view and manage all the Geofence records.
To Create Geofence Individually
- Click on the
 button on the top right corner.
- The Geofence configuration screen will open.

-
- Provide the Name of the Geofence.
- Select the Category of the geofence from the drop-down list.
- Select Area, for Geofence with no condition.
- Select Stay in Zone, for creating a geofence where needs to stay inside the created geofence.
- Select Stay Away from Zone, for creating a geofence where needs to stay away the created geofence.
- Select the Type of Geofence from the drop-down list.
- Select Circle for round shaped Geofence.
- Select Square for rectangle or square shaped geofence.
- Select Polygon if you want to create your custom shape geofence.
- Choose the Tolerance from the dropdown list, as this setting will assist in defining a radius. This will ensure accurate tracking of geofence entries and exits.
-
- Provide a Description if necessary.
- To create a geofence on map: you have 3 options.
- Tap on the desired location on the Map to create a geofence.
- click on
 search and choose the desired location, you will redirected to that location on the Map, now you can create the geofence on that location.
 - Click on the
 icon it will show your current location on the map, now you can create the geofence on that location.
Please Note: While using the 3rd option to add location, you need to grant the location permission for the device.
- Click on the Save icon.
To Add Geofence from Web Portal.
Please Note: Only Admin, Reseller & subuser's can add Geofence from WebPortal, Consumer don't have web portal access.
- Log in to your account.
- Go to Settings > Master > Geofence.
Upon clicking on Geofence, you will be directed to the Geofence Overview page, where you can view and manage all the geofence records.
To Create Geofences Individually
- Click on the ➕ button on the taskbar.

- Select the Reseller and Consumer from the drop-down list.
- Provide the Name of the geofence.
- Select the Category of the geofence from the drop-down list.
-
Select the appropriate Geofence Access option to define the visibility and accessibility of geofences for users:
- Public: Choose this option if the geofence should be visible to all users.
- Private: Choose this option to ensure the geofence is visible only to the user who created it.
-
- Choose the Tolerance from the dropdown list, as this setting will assist in defining a radius. This will ensure accurate tracking of geofence entries and exits.
- Provide a Description if necessary to clarify the purpose or details of the geofence.
- On the Map, search and select the desired Location.
- Draw a geofence in either a Polygon, Rectangle or Circle shape as per your requirement.
Polygonal Geofence: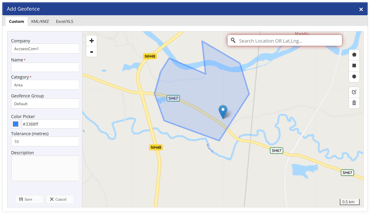
Rectangular Geofence:
Circular Geofence: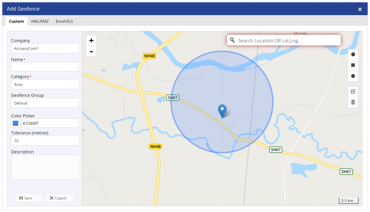
-
- Click on the Save 💾 icon
To Create Geofence in Bulk
- Click on the Upload button on the taskbar.
-
- Select the Reseller and Consumer under which you want to create the geofence from the drop-down menu.
- To upload a file, first you need to download the sample file from the given link. Fill in the details of geofence like type, name, category, geofence coordinates, description, tolerance and radius in the given format and then Upload the file by clicking on Choose file.
- Click on the Save 💾 icon.