
The Road Fence Deviation Alert is used to notify users whenever the vehicle deviates from the configured road fence. The alert is triggered when the vehicle moves outside the defined road fence path.
Parameters Considered (Prerequisites)
- Roadfence : Roadfence needs to be created in order to trigger this alert.
Please Note: To create the road fence navigate to Settings - Master - Geofence.
How to Configure
-
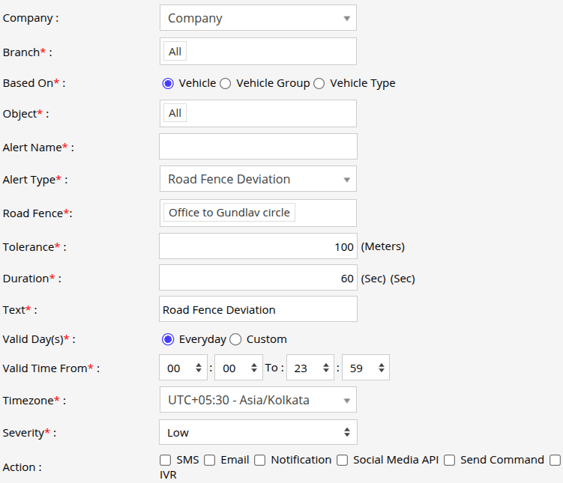
Select the correct Company and Branch for whom the alert is to be configured.
-
Based On: Choose on what you want to base the alert configuration (Object, Object Group, Object Type).
- Object: Select individual vehicles for whom you want the alert to generate.
- Object Group: Select a group of vehicles for whom you want the alert to generate.
- Object Type: Select vehicle or object type for whom you want the alert to generate.
-
Select the Object based on the previous step selection.
-
Set an Alert Name for identification of the alert.
-
Select the Alert Type as Road Fence Deviation.
- From Roadfence, select the roadfence for which the alert is to be triggered.
- From Tolerance, specify the allowed deviation distance from the configured road fence. The alert will be triggered only when the vehicle moves beyond the defined tolerance limit.
- From Duration, specify the time duration for which the vehicle should remain outside the configured road fence before the alert is triggered. The alert will be generated only if the deviation continues for the selected duration.
- In the Text field, enter the message that will be displayed when the alert is triggered.
- Select the Valid Days, Everyday or Custom.
- Everyday: This alert will be triggered, everyday in case of a violation in accordance to these parameters set.
- Custom: Mark the checkboxes of the days, when you want this alert to be triggered for. (eg., Sun, Mon and Sat)

- Enter the Valid Time From and To. The alert will be generated inside the time range that you have selected.
- Select the Timezone.
- Select the Severity of the alert (Low, Medium, or High).
- Mark the checkboxes of the medium via which you want the Action or Notification to be sent. (eg., SMS, Email or Notification)
- SMS: To receive an alert by SMS, enable the checkbox, enter the phone numbers.
- Email: To receive an alert by Email, enable the checkbox, enter the recipients of the email.
- Notification: To receive an alert on the system Push Notification, enable checkbox.
- From Users, select the users that will receive the notification.
- From Notification Sound. Select the sound from the drop-down that will be played for this notification.
- Social Media API: To receive an alert on Whatsapp or Telegram, enable this checkbox
- From Gateway, select Whatsapp or Telegram on which the notification is to be send.
- In Recipient Number, enter the phone numbers, use the country code.
- Send Command: To send a command when the alert is triggered, enable the checkbox & enter the command that is to be send.
- IVR: To receive alerts through IVR ( automated voice call ), enable the checkbox.
- In To Numbers, enter the phone numbers.
- Click Save 💾 icon. to save the alert configuration.
Please Note:
-
To Receive the alert on SMS, Email, Whatsapp, Telegram & IVR the api should be configured either on Admin, Reseller or Company.