
The address overstay alert is generated when the vehicle/object stays for a longer duration in the address tolerance than the specified time. This alert was introduced to better assist the fleet managers in operational activities in ways such as; in order to give better ETAs to their clients. 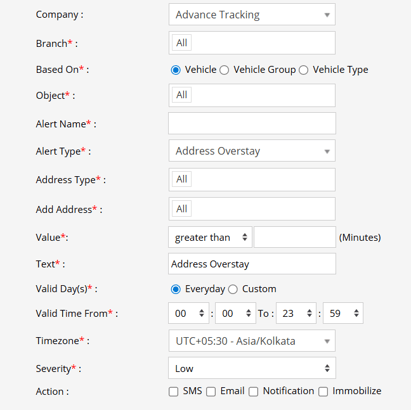
Parameters Considered (Prerequisites)
- Address: The system checks if an address is defined or not in order to trigger an Address OverStay alert.
Note: It is mandatory to define an Address in General > Master > Address.
- Vehicle Movement: The system checks whether the vehicle is stationary.
- Address Type: Address type is a POI(Point of Interest) for which an address is added and is defined as. (example: a hospital, a bank, a warehouse) These are all the predefined address types available in our dropdown list, it is mandatory to define an address under an address type.
- Address Tolerance (meters): The address tolerance is the area in meters around an address which is to be considered as a part of the address.
Example: 300 meters is the address tolerance. Now, that 300 meters around that address will be considered as that address.
How to Configure
- Select the correct Company and Branch for whom the alert is to be configured.
- Select the Object and Object Group or Object Type
- Set an Alert Name for the identification of the alert in your system.
- Select the Alert Type as Address Overstay.
- Select the Address Type from the drop-down.
- Add Address for which you want this alert to be triggered.
- In the Value field, enter the tolerant stay time. (eg., 15 minutes)
- In the Text field, enter the text that will be displayed when the alert will triggered.
- Select the Valid Days, Everyday or Custom.
- Custom: Mark the checkboxes of the days, when you want this alert to be triggered for. (eg., Sun, Mon and Sat)
- Everyday: This alert will be triggered, everyday in case of a violation in accordance to these parameters set.
- Enter the Valid Time From and To, you want this alert to stay effective.
- Select the Timezone.
- Select the Severity of the Alert. (eg., low, medium or high).
- Mark the checkboxes of the medium via which you want the Action or Notification to be sent. (eg., SMS, Email, Notification or Immobilize)
- Click on the Save button to save the alert configurated.
Example:
If an object is supposed to take 15 minutes unloading at a Warehouse, but it exceeds the time of 15 minutes and takes 20 minutes, an Address OverStay will be triggered and as per configuration, the notification and action will be sent or taken respectively.
SMS: To receive an alert by SMS, enable the checkbox, enter the phone numbers and it is supposed to be configured when creating a reseller account, a company account or an admin account.
Email: To receive an alert by Email, enable the checkbox, enter the recipients of the email, and it is supposed to be configured when creating a reseller account, a company account or an admin account and verified while configuring the Alert.
In-App: Enable the checkbox and you’ll receive notifications according to the Severity Set i.e Low, Medium or High.
Immobilize: To immobilize a vehicle, enable the checkbox, enter the queue duration, make sure the sensor attachment is done with connection type Digital Output or Specific Immobilization ports and immobilization checkbox is enabled on the Admin account, Reseller Account and the Company Account.
When Based On: Object, Object Group, or Object Type
- Object: Select individual vehicles for whom you want the alert to generate.
- Object Group: Select a group of vehicles for whom you want the alert to generate.
- Object Type: Select vehicle or object type for whom you want the alert to generate.