
In the system, an Engineer refers to an individual who works for the company and visits different construction sites as part of their job. The system tracks the kilometers traveled by the Engineer while visiting these sites. This information helps the company monitor the total distance traveled, maintain accurate travel records, and ensure accountability for site visits.
The Engineer Can Login into the Smart Trip App, Available on IOS & Android.
To Get Started
- Log in to your account.
- Go to Settings > General > Driver.
Upon clicking on the Driver, you will be directed to the Driver Overview page, where you can easily view and manage all Engineer records.
To Add Engineer Individually
-
Click on the ➕ button on the taskbar.

Navigate to Profile
-
- From the drop-down menus, select the Company, and Branch under which you want to add the Engineer.
- Select Engineer from the drop-down list.
- Please input the Engineer's First Name, Last Name, and, if applicable, the Employee Number into the designated fields provided.
- Upload the Photo of the Engineer.

- Shift Group: Choose the group if the engineer is assigned to work during specific shift timings.
- Shift: Assign the engineer to the appropriate shift based on the defined shift schedule.
Please Note: The shifts created on the Company screen will be available for selection in the Shift Group and Shift fields. To learn how to create a Shift, on the Company screen.
-
- Provide the Country, State, City, Zip - Code of the engineer.
- Add the address in Street1 & Street2.
- Provide the Contact number1 & Contact number2 of the engineer.
- Provide the Email Id of the engineer.
-
- Select Engineer as User designation. Enabling this option is necessary for clients who wish to allow engineer to access the Smart Trip Application using their credentials. (Smart Trip IOS & Android app link)
- Upon selection of Engineer as user, the User Setting tab will become visible, allowing you to configure the Login credentials for the application.

The Smart Trip application is exclusively available with the Premium variation of the platform.
Navigate to Additional Info
The user can add the additional details of the engineer in the mentioned fields.

- Enter the Date of Birth of the employee.
- The Age will be calculated based on date of birth.
- You can enter the Date of Joining and Retirement Date for the engineer.
- In Driving Experience Since enter the year from which the engineer started driving to record their driving experience.
- In License Available select Yes if engineer has driving license, Select NO if engineer dosen't have the driving license.
- If you have selected Yes you will get the additional option.
- In License Number, Enter the engineer's driving license number.
- In License to Drive, select what type of vehicle the engineer is allowed to drive as per the license.
- In License Issued Date & License Expiry Date, enter the issue & expiry date for the driving license.
- If you have selected Yes you will get the additional option.
- In Life Insurance Number, enter the isurance policy number if provided to engineer.
- In Life Insurance Expiry Date, enter the insurance policy expiry date.
- In Mediclaim Number, enter the mediclaim policy number if provided to engineer.
- In Mediclaim Expiry Date, enter the mediclaim policy expiry date.
- From Active checkbox, you can keep the check if engineer is still working with the organization, you can uncheck the box if engineer is not working with the organization.
Navigate to User Settings
.png?width=409&height=489&name=Frame%20661%20(11).png)
-
- Provide the Username for the engineer who will be using it to log in to the Smart Trip application and confirm it by retyping the username in the Confirm Username field.
- Authentication via:
- OTP: Provide the mobile number where you would like to receive the OTP.
.png?width=448&height=87&name=Frame%20661%20(9).png)
- Password: Enter the Password for the login credentials and confirm it by retyping the password in the Retype Password field.
- OTP: Provide the mobile number where you would like to receive the OTP.
- Object: From the dropdown menu, you can select multiple objects.
- Time Zone: Choose the Timezone according to the engineer's location. Based on the Timezone selection, the analytics will appear in the application.
- Date Format: Please choose the desired Date format from the drop-down menu.
- Time Format: Choose your preferred Time format from the drop-down menu.
- Language: Choose the appropriate Language from the drop-down menu.
- Mobile App Notification: Activate this option to allow the engineer to receive notifications in the mobile app.
- User Status: You have the ability to enable or disable the user account using the provided option.
- Mobile Access: You have the option to restrict user access to a specific mobile device by entering the Mobile Unique Identification Number provided in the mobile application.
.png?width=499&height=94&name=Frame%20661%20(10).png)
- Click on All if you want the engineer to have Mobile Application access from any mobile phone.
- Click on None if you don’t want the user to access the Mobile application.
- Click on Specific if you want the user to have access to the Mobile application with a specific mobile device only.
- In Mobile Unique Identification No enter the IMEI of the device from which the driver can login using the credentials, You can enter multiple IMEI using commas separated values.
-
- SMS Login Details: Enable this option to provide the login credentials on the SMS.
The User Settings tab will become accessible for roles such as Driver, Engineer, Supervisor, and Mechanic, as these employee designations are permitted to log into the designated application using their credentials.
Navigate to Leave
The company has the capability to establish and manage the engineer's leave policies.

-
- Click on Leave ➕.
- Select the Leave Type.
- Specify the Number of Leave days.
- Select the start date and end date in Valid From and Valid To to define the duration for which the leave is valid.
- Click on the Bin Icon to delete the entry.
Navigate to Document
The documents of the engineer can be managed in one place.
- Click on Document ➕.
- Select the appropriate Document Type for the document you intend to upload from the dropdown list.
- If your document is not listed, select the Custom option in the Document Type field. Then, enter the name of the document you want to add in the Document Name field.
- Enter Document Name.
- Upload the Document from your system.
- Choose the appropriate Issue Date by utilizing the date picker provided.
- Choose the Expiry Date using the date picker provided.
- You can download the document by clicking on the Download
 icon.
icon. - To set a reminder for your document's expiry date, simply click on the Add Reminder
 icon, which will help you ensure timely renewal.
- Add Reminder Name for your reference.
- Select the Reminder Type from the dropdown.
- Notify Before (X) Days: Indicate the number of days in advance you wish to receive the reminder.
- Choose your preferred method of receiving reminders from the Remind Using field.
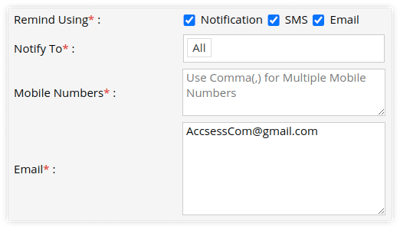
- Notification: Choose the appropriate users from the dropdown list under the "Notify To" section to receive notifications.
- SMS: Add the mobile number in the provided text box on which you want to send the reminder. Use a comma (,) as a separator if you are adding multiple mobile numbers.
- Email: Add the email address to which you want to send the reminder. Use comma (,) as a separator if you are adding multiple email addresses.

The Email Configuration or SMS Configuration is required in order to receive Email or SMS for reminder.
-
- You can also Delete the document by clicking on the delete
 icon.
icon.
- You can also Delete the document by clicking on the delete
- Click on the Save 💾 icon to save the engineer configuration.
Please Note: You can view the engineer trip details by going to Reports - Employee - Employee Wise Report.
To Upload Multiple Records
- To initiate the bulk upload process, kindly click on the upload button located on the taskbar. This action will open a new window designed for driver bulk uploads.

- From the drop-down menus, select the Company, and Branch under which you want to add the driver.
- Choose the Country of the driver.
- Please choose the appropriate Employee Designation from the drop-down list.

-
- Download the provided sample file from the given link. This file contains essential information regarding the engineer, Fill in the appropriate information in the file according to your requirement.

- Upload the XLS file from Upload File option.
- Click on the Save 💾 icon.
- Download the provided sample file from the given link. This file contains essential information regarding the engineer, Fill in the appropriate information in the file according to your requirement.
To Add Driver, Click here.
To Add Representative, Click here.
To Add Employee, Click here.