
The Send Command feature enables users to remotely send specific commands to the GPS devices installed in vehicles. This functionality allows for the execution of various actions or configurations on the device via GPRS.
There are two ways to send commands to the device: SMS Commands (SMS Service Configuration is required) and GPRS commands.
The users have the ability to send these commands from two different screens on the platform: the Send command screen and the Live tracking screen.
Watch : How to Configure Send Command.
To Get Started
- Log in to your account.
- Go to Settings > Master > Send Command.
Upon navigating to the Send Command screen, you will be directed to the Send Command Overview page, where you can view a history of all previously sent commands.
To Send Command to Multiple Vehicles At the same time
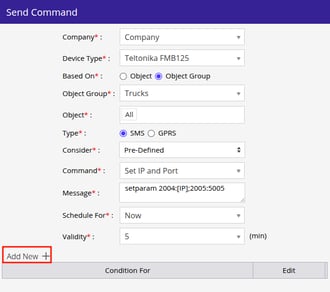
- Click on the ➕ button on the taskbar.

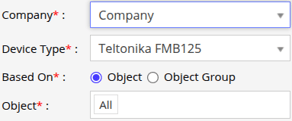
- Select the Company from the dropdown list.
- Select the Company from the dropdown list.
-
- Select the Device Type from the dropdown list.
- In Based On select from Object or Object Group.
- Select Object if you want vehicle to be listed based on the selected device.
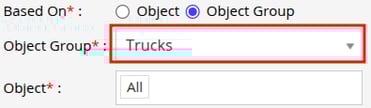
- Select Object Group If want vehicles to be listed inside the selected object group.
- From Object Group select the group from which you want the vehicle to be listed.
- From Object Group select the group from which you want the vehicle to be listed.
- elect the Object from the dropdown list to which you would like to send the command.
- Select the Type of command to be sent.
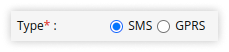
- SMS: SMS commands are often used in situations where a direct internet connection or data service is not available or practical.
Please Note:
- User Needs to configure the SMS API in order to send SMS based command.
- When an SMS command is sent, a response from the device will not be received.
-
-
- GPRS: GPRS commands are typically used to communicate with devices or sensors that are equipped with GPRS connectivity.
-
Please Note:
-
The GPRS command will work only for devices that are already connected to the server.
-
When a GPRS command is sent, the user can expect to receive a response from the device.
-
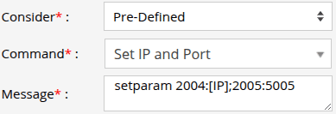
- In Consider, select from Pre-Defined or Template.
- Pre-Defined: Commands that are already added by the software provider.
- Template: Commands created by the user will be listed under the Template option.
- In Consider, select from Pre-Defined or Template.
Please Note: To command created using Commands screen will be listed inside the template option.
-
- Select the Command from the list that you want to send. The available commands will appear based on your selection of Pre-Defined or Template.
- In Pre-Defined, you will find the Custom option, which allows you to enter commands that are not listed in the available options.

- In Pre-Defined, you will find the Custom option, which allows you to enter commands that are not listed in the available options.
- In the Message field, the command for the selected Pre-Defined or Template option will be displayed. The user can edit the command if required, or enter their own command when the Custom option is selected.
-
Choose the appropriate Schedule For option based on your requirements.
- Now:

When you select Now, the command will be sent at the current time. - One Time:

When you select One Time, the command will be sent only once at the Execution Time selected. - Hourly:

When you select Hourly, the command will be sent every hour at the minute selected in Executed Hour. - Daily:

When you select Daily, the command will be sent daily at the time selected in Execution Time. - Weekly:

When you select Weekly, the command will be scheduled to send weekly on the days selected in Execution Day and time selected in Execution Time. - Monthly:

When you select Monthly, the command will be scheduled to send every month on the date selected in Execution Day and time selected in Execution Time.
- Now:
- Select the Command from the list that you want to send. The available commands will appear based on your selection of Pre-Defined or Template.
-
- The system will attempt to send the command multiple times within the Validity period you specify, continuing until a response is received from the device. If the device does not respond, the command will be marked as inactive, and the reason for failure will be displayed in the History
 popup.
 - To Send a command based on specific condition click on the ➕ button.
- The following Pop-Up will open.
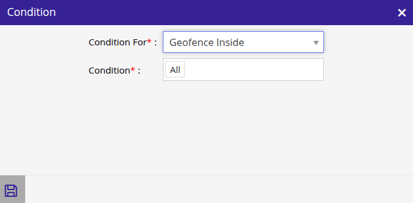
- In Condition For, you can select from Geofence Inside, Geofence Outside & Inactive.
- The system will attempt to send the command multiple times within the Validity period you specify, continuing until a response is received from the device. If the device does not respond, the command will be marked as inactive, and the reason for failure will be displayed in the History
-
-
- Select Geofence Inside, if you want the command to be send when the vehicle enters the selected geofence.
- In Condition, Select the Geofence for which you want this command to work.
- Select Geofence Outside, if you want the command to be send when the vehicle exits the selected geofence.
- In Condition, Select the Geofence for which you want this command to work.
- Select InActive, if you want to send the command whenever the device goes inactive.
- Select Geofence Inside, if you want the command to be send when the vehicle enters the selected geofence.
- Click on the Save 💾 icon to save the condition.
-
Please Note: The Inactive condition will only work with SMS based command.
- Click on the Save 💾 icon to send the command at the scheduled time.
To Send Command from the Live Tracking Screen
- Log in to your account.
- Go to Live Tracking.
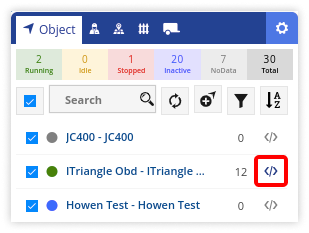
To Send Command to a Single Object
-
- Click on the </> icon on the Object tab.
- Select the Type of command to be sent.
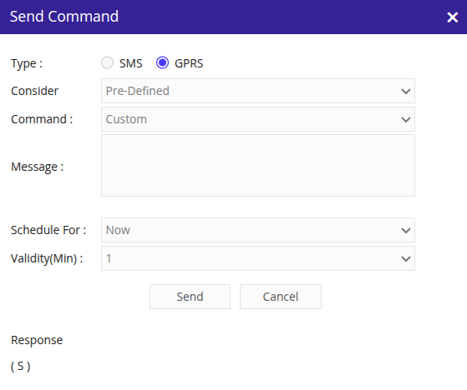
- In Consider, select from Pre-Defined or Template.
- Pre-Defined: Commands that are already added by the software provider.
- Template: Commands created by the user will be listed under the Template option.
- Select the Command from the list that you would like to send.
- Enter/Edit the Message that you would like to send as a command.
- Select the Schedule For based on your requirements.
- The system will try sending the command for the time period you select in Validity until the device responds.
- Click on the Send button to send the command at the scheduled time.
- Select the Type of command to be sent.
- Click on the </> icon on the Object tab.
To Download Command Details
- Log in to your account.
- Go to Settings > Master > Send Command.
- Click on the Download button on the taskbar.

- A file with an XLS extension gets downloaded.

- You may distribute this file to others or utilize it for your specific purposes as needed.
To send commands from the mobile application, click here.
To download the command details from the mobile application, click here.