In the system, a Driver is an individual assigned to operate a vehicle within the platform. The driver is linked to a specific vehicle or fleet and is responsible for ensuring safe, efficient, and compliant operations.
The system tracks the driver's performance, behavior, and activities, providing insights such as trip data, driving habits, and safety compliance by identifying unsafe practices like overspeeding or prolonged idling. This information enables better fleet management, enhances safety, and promotes accountability.
To Get Started
- Log in to your account.
- Go to Settings > General > Driver.
Upon clicking on the Driver, you will be directed to the Driver Overview page, where you can easily view and manage all driver records.
Watch : How to configure Driver.
To Add Driver Individually
-
Click on the ➕ button on the taskbar.

Navigate to Profile
-
- From the drop-down menus, select the Company, and Branch under which you want to add the driver.
- The system provides the flexibility to create accounts with various designations, including Driver, Employee, Engineer, Supervisor, and more, directly from the driver screen. Therefore, please select the appropriate Employee Designation from the dropdown list.
- Please input the driver's First Name, Last Name, and, if applicable, the Employee Number into the designated fields provided.
- Upload the Photo of the driver.

- Select the appropriate option from in the Tag Via field to specify whether the driver will be associated with an object using a Beacon or RFID tag.
-
- Once you have made your selection in the Tag Via field, kindly enter the corresponding RFID Tag or Beacon Tag information in the designated field provided.
.png?width=368&height=83&name=Frame%20661%20(1).png)
.png?width=367&height=82&name=Frame%20661%20(2).png)
- Once you have made your selection in the Tag Via field, kindly enter the corresponding RFID Tag or Beacon Tag information in the designated field provided.
-
-
- Provide the Country, State, and detailed Address information for the driver, including City, Zip Code, and Street.
- Provide the Contact number of the driver.
- Provide the Email Id of the driver.
- Authentication via:
- Password: Enter the Password for the login credentials and confirm it by retyping the password in the Retype Password field.
- OTP: Provide the mobile number where you would like to receive the OTP.
-
- Assign a Default Object Number by selecting the vehicle from the dropdown.
The Object dropdown menu will display the objects associated with the selected company and branch.
Navigate toAdditional Info
The user can add the additional details of the driver in the mentioned fields.

Navigate to Document
The documents of the drivers can be managed in one place. Learn how to Manage documents.
Click on the Save 💾 icon to save the driver configuration.
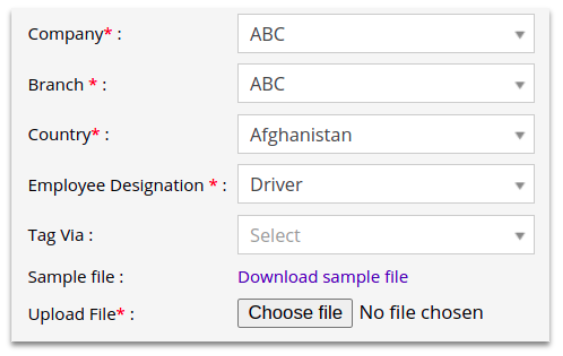
To Upload Multiple Records
- To initiate the bulk upload process, kindly click on the upload button located on the taskbar. This action will open a new window designed for driver bulk uploads.

- From the drop-down menus, select the Company, and Branch under which you want to add the driver.
- Choose the Country of the driver.
- Please choose the appropriate Employee Designation from the drop-down list.
- Select the appropriate option from in the Tag Via field to specify whether the driver will be associated with an object using a Beacon or RFID tag.
- Download the provided sample file from the given link. This file contains essential information regarding the driver, including the driver's name, contact number, state, city, and tag details. Fill in the appropriate information in the file according to your requirement.

- Upload the XLS file from Upload File option.
- Click on the Save 💾 icon.