
Users can easily bulk-upload the object details from the system. These details will get uploaded altogether using an excel file which needs to be downloaded and details needs to be filled. To upload multiple object records consider the following steps.
The objects with devices of the same type can be added together in bulk. However, if the devices are of different types, the user will need to repeat the process for each type to upload the object details.
To get started
- Login to your account.
- Go to Settings > General > Object
The page you land on is the object overview page where you can have a look at all the object records.
To upload multiple records
- Click on the Upload button on the taskbar.

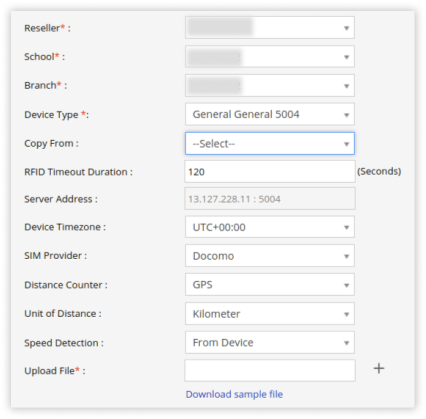
- A new Bulk Update window will appear.
Please Note: The details you fill in this section are common details and will be fetched for all the objects you add to the excel sheet.
- Select Reseller under which you want to add object from the dropdown menu.
- Select School under which you want to add object from the dropdown menu.
- Select Branch under which you want to add object from the dropdown menu.
- Select the GPS device from the Device Type dropdown.
- Use the Copy From option for copying the details which are already existing.
- The system will provide the Server Address as you select the integrated device.
- Enter RFID Timeout Duration in seconds.
- Device Timezone should be added as per the timezone configured on the device.
- Enter the SIM Provider name.
- Select the Distance Counter from the dropdown list and based on that the distance travel will show on the platform. Please select the default distance counter as GPS. If you are using a CAN device, then select CAN Odometer.
- Select the Unit of Distance and based on the selected unit, the system will work according to the selected unit.
- Select how you want the speed of the vehicle to be detected from Speed Detection.
- To upload a file first, you need to download the format from the given link. Fill in the details of objects in the given format and then Upload the file by clicking on the ➕ icon.
- According to the device type selected, you will see a sensor table with the connection type and connected sensor, reading type, and work hour calculation.
- Activate the connection type by clicking on the checkbox given in the Active column.
- Click on the dropdown of Connected Sensor and select the sensor.

- If you are using a digital sensor then you have to select Reading Type.
- You can enable Work Hour Calculation only if you are using a digital sensor.
- Click on the Save 💾 icon to save the setting.