
The Student Management module in Smart Bus enables administrators to create, manage, and maintain student records efficiently. This module acts as the foundation for transport allocation, attendance tracking, and parent communication.
It supports multi-level configuration, including school, branch, class, and transport preferences.
To Get Started
- Log in to your account.
- Go to Settings > Master > Student.
Upon clicking on the Student, users will be directed to the Student Overview page, where they can easily view and manage all Student records.
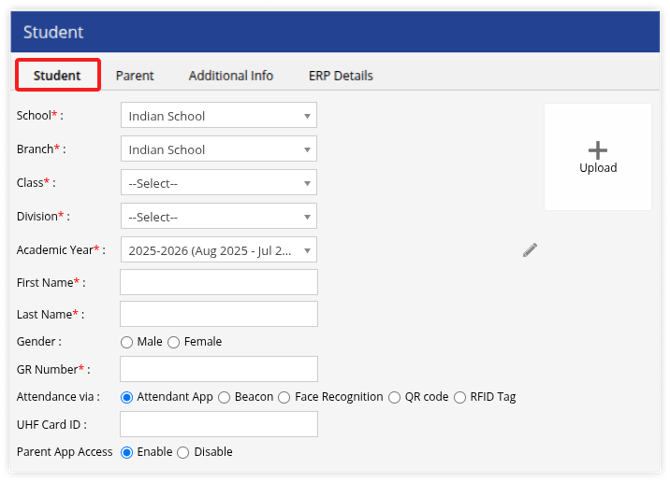
To Add Student Individually
- Click on the ➕ button on the taskbar.
Navigate to Student
-
Select the School and Branch from the dropdown where you want to add the student.
-
Select an existing Class or create a new one.
-
Select an existing Division or create a new one.
-
Select an existing Academic Year or create a new one.
-
Enter the student's First name.
-
Enter the student's Last name.
-
Select the student's Gender.
-
Enter the student's GR number (this must be unique for each student).
-
Upload Student Photo
-
Select the attendance method:
-
Attendant App
-
Beacon
-
Face Recognition—Enter the Face Recognition tag assigned to the student

-
QR Code
-
RFID Tag – enter the RFID tag assigned to the student
.png?width=634&height=87&name=Frame%20679%20(1).png)
-
UHF Card ID – used when UHF-based attendance is enabled; enter the physical UHF card ID given to the student
-
-
Enable or disable Parent App Access as needed.
Note: Ensure that the selected Academic Year is valid for the current month. If it is not active, the student will not be available for selection while creating a trip.
Navigate to Parent
.png?width=461&height=110&name=Frame%20675%20(1).png)
-
Enter parent/guardian details:
-
Parent Name (mandatory)
-
Parent Gender
-
Parent Email ID
-
Mobile Number (mandatory)
-
.png?width=670&height=370&name=Frame%20679%20(2).png)
- Configure communication and verification settings:
- SMS Alert—if enabled, the parent can receive notifications via SMS
- Verification Method – choose one of the following:
- OTP – available when the SMS API is configured
- Password – set a password for authentication
- Additional details:
- Relationship Mapping
- Parent Profession
- App Access—if enabled, the parent can log in to the parent application
Note: The Registered Parent Mobile number and Password will be used to log in to the parent mobile application.
A maximum of three parent profiles can be created for each student.
Navigate to Additional Info
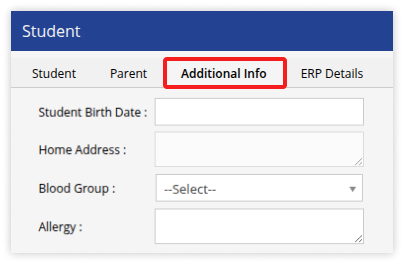
- Optional fields for Additional Student Information
- Add Student Birth Date
- Student's Home Address provided in the Parent Application will be displayed here.
- Select Blood Group
- Allergy (if any)
- Click on the Save 💾 button.
To Add Student in Bulk
- To add student in bulk, please click on Add Student in Bulk
To Update Student in Bulk
- To add student in bulk, please click on Update Student details in Bulk